
Bulk workflows and critical load filter in Checkbot
Calculate load extremes for all connections
In projects with many nodes and load combinations, similar connections with very similar load effects are analyzed repeatedly. To effectively reduce the calculation time, the Calculate load extremes algorithm identifies critical load combinations in a defined group of connections and speeds up the calculation time by up to 80%.
This function, together with the bulk group actions in Checkbot, enables users to design all connections in a project with minimal time. After that, users can deactivate the function and calculate all connections with all load effects as the final check.
The Calculate load extremes functionality is available only for Checkbot projects imported from FEA models, since CAD models usually don't contain any load effects.
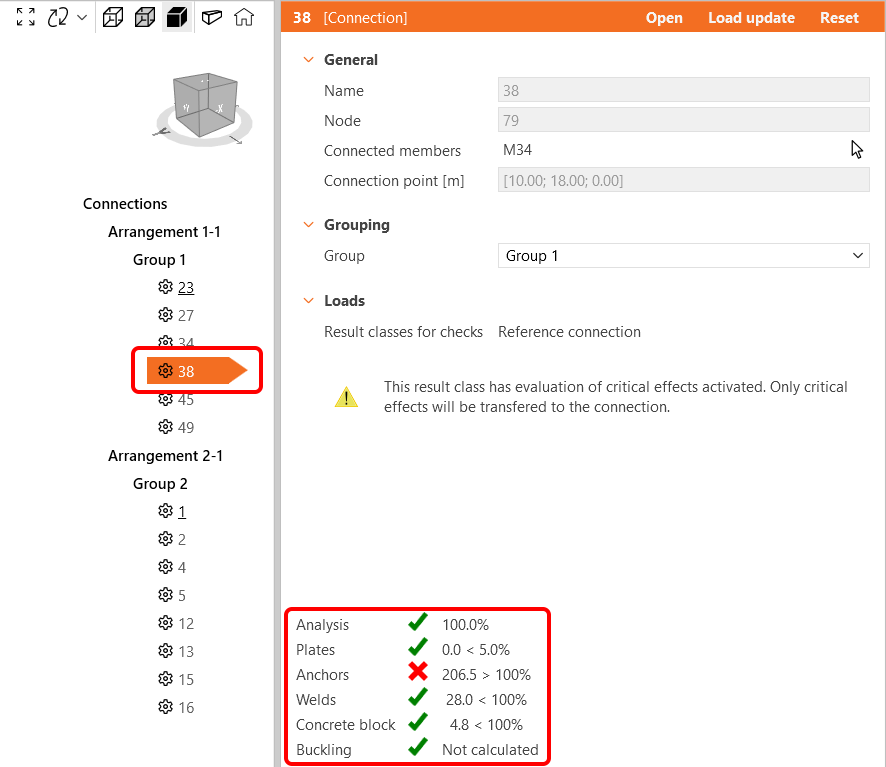
Note: For complex connections, it is advisable to perform the final calculation using the entire set of load effects to ensure all loads defined in the global structural model are clearly accounted for.
How to use the Calculate load extremes function
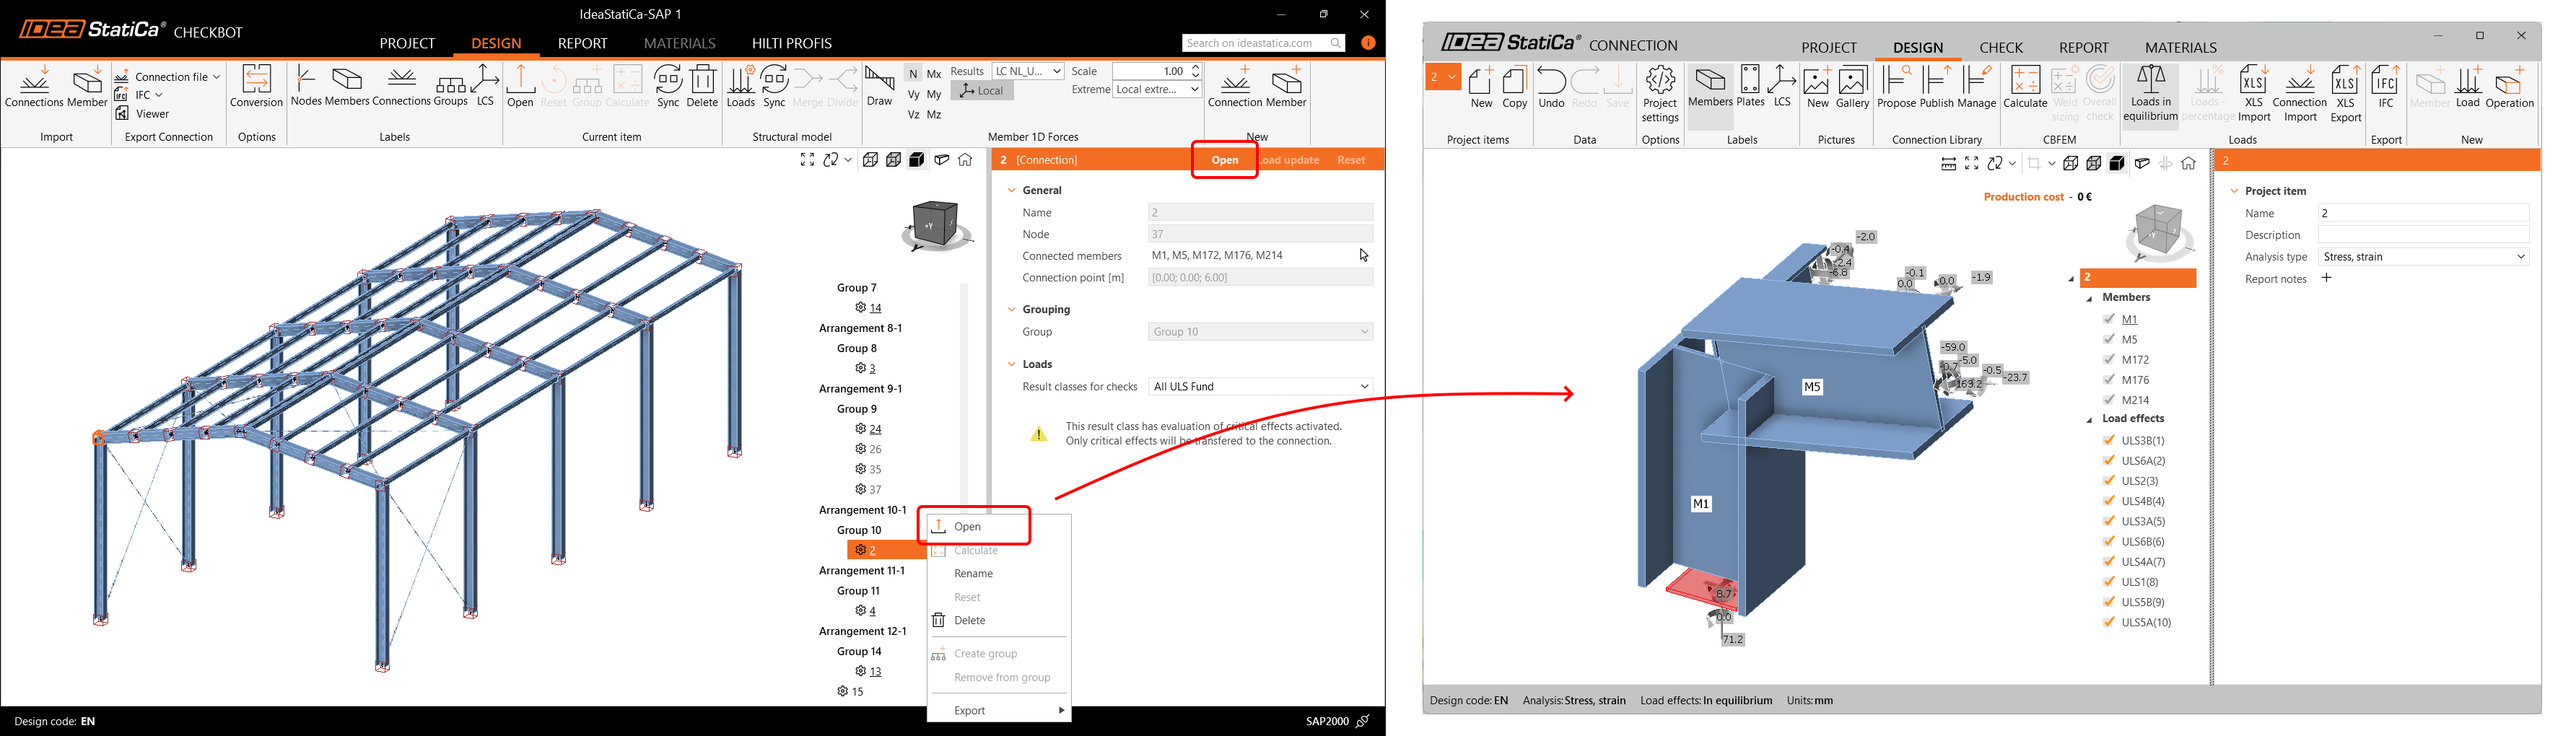
Calculate load extremes represents the Checkbot bulk variant of the function Calculate load extremes, which is available for single connections in the Connection app.
First, for an automatically or manually created group of connections, design the reference connection.
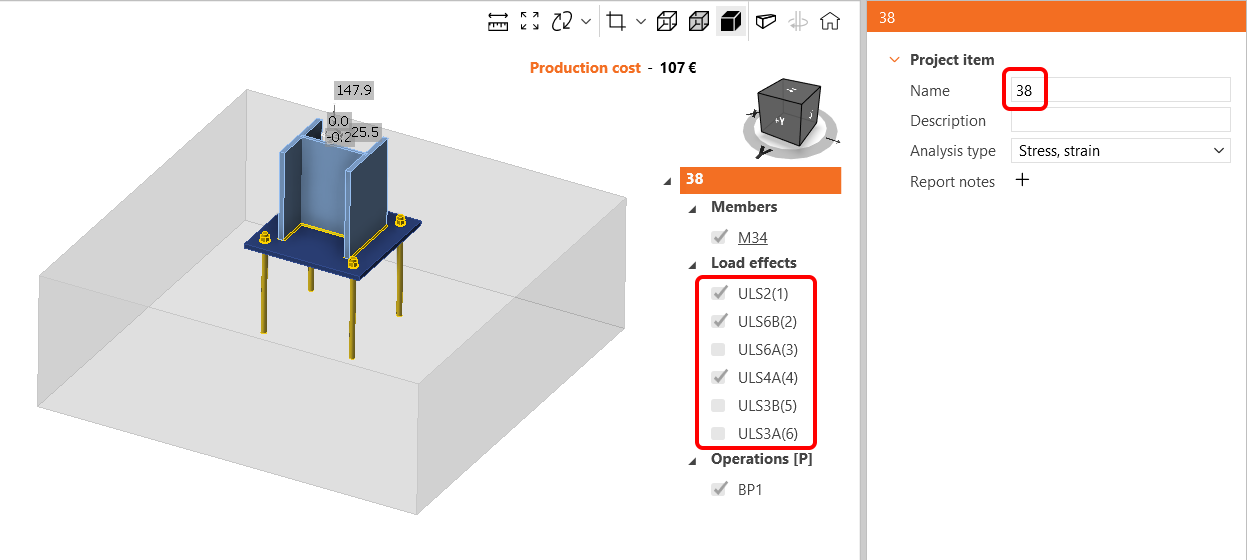
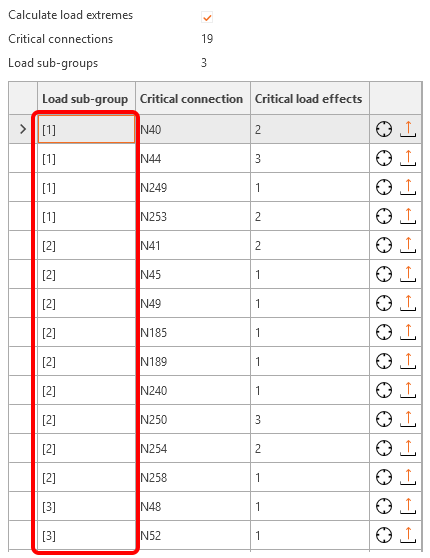
Then select the group and tick the Calculate load extremes combo box. This runs the algorithm, and a tab appears showing only connections containing the critical load effects.
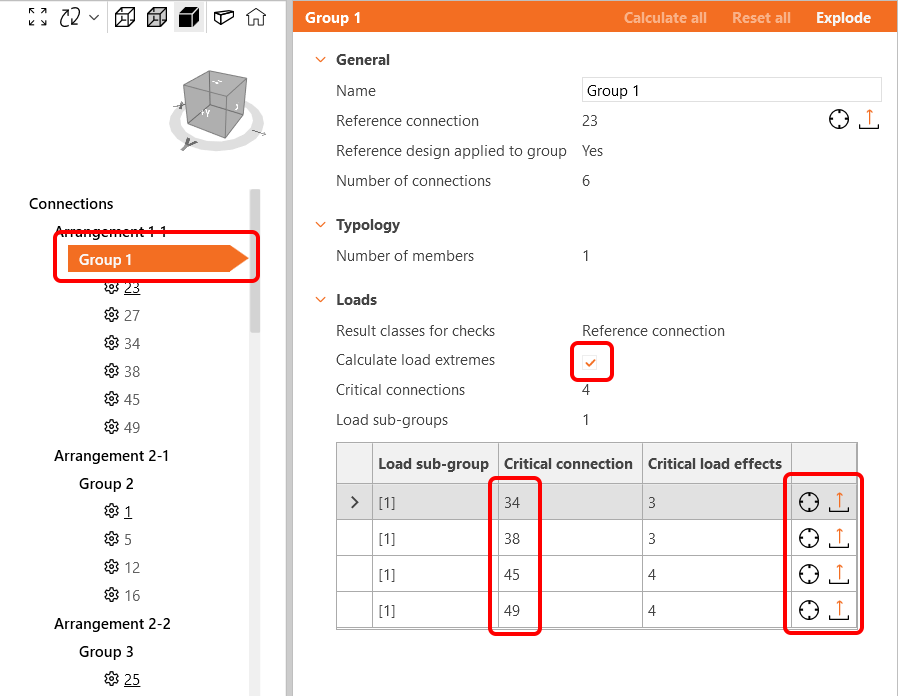
Now, only the critical load effects detected in several connections can be calculated. All other load effects in this group are disabled (for some connections, all load effects are disabled).
Calculate the group of connections and browse the results for critical load effects. Optimize the design of the reference connection or even reshuffle groups to finish with the best result.
If the Calculate load extremes function is applied to a group of nodes where a member has more cross-section variants (e.g., a group of 10 nodes where a column has cross-section HEB300 in 6 nodes and HEB340 in 4 nodes), then more Load sub-groups are created to cover all the variants and stay on the safe side.
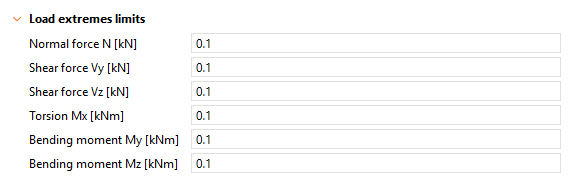
Limits for the Calculate load extremes function are currently not editable and are set to 0.1 for all internal forces.
Easy work with groups
A series of improvements is ready to boost your experience when working with multiple connections and groups in Checkbot.
Automatic group creation
When the first bulk import of multiple nodes from the FEA global structural model into Checkbot is performed, nodes are sorted into Arrangements based on their geometry, and the Groups are created automatically. For each Group, a Reference connection is set.
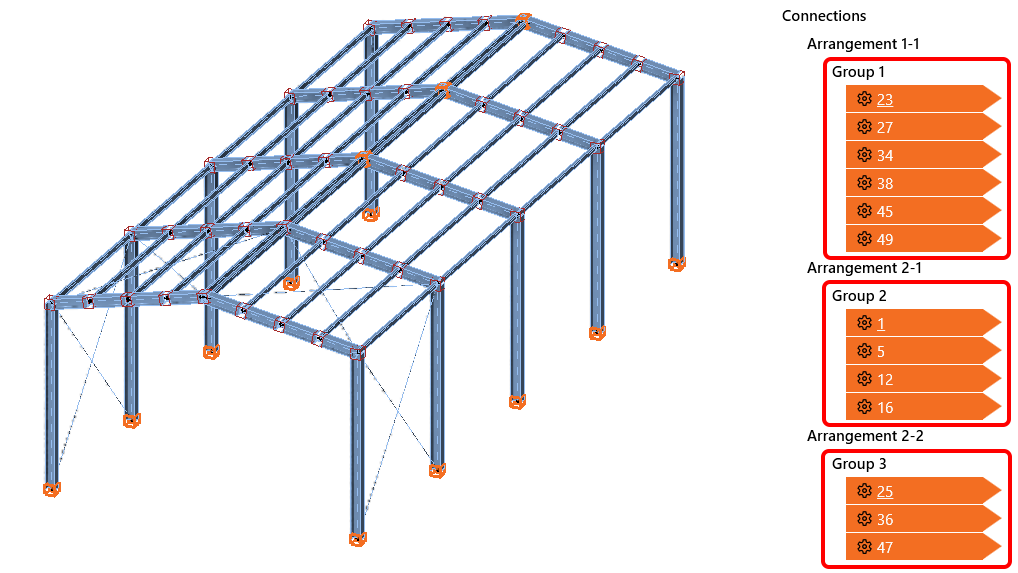
If there are any nodes imported later on, those are not inserted into any Group but are listed at the bottom of the appropriate Arrangement, ready to be manually sorted into existing or new Groups.
Connection group highlighted
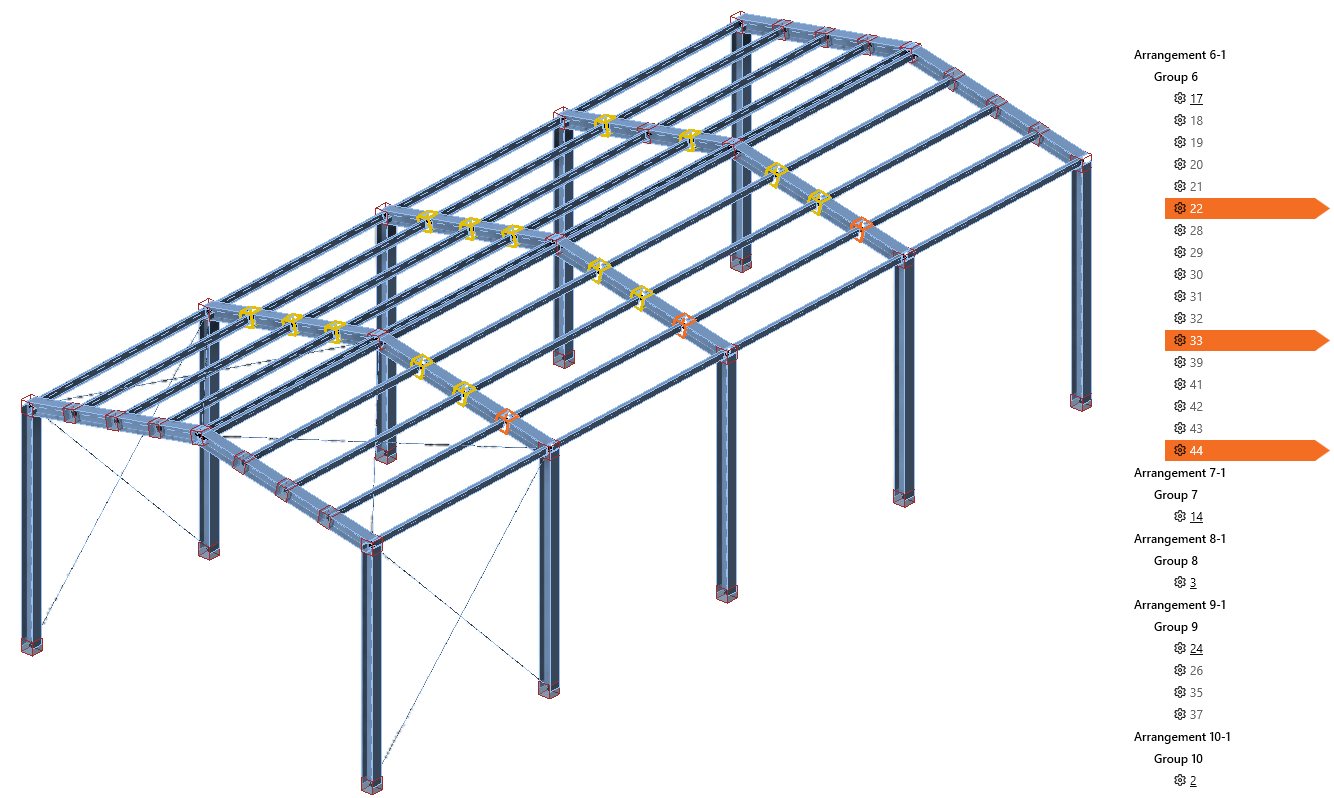
When a Group of nodes is selected in the tree list, all nodes in the group are highlighted in the scene with a yellow contour line. When a node is selected, it is highlighted in the 3D scene with an orange color while the group highlight is still active.
New tree and scene statuses
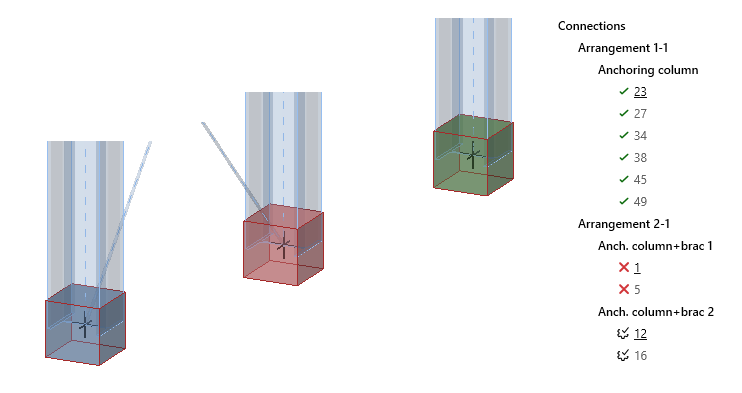
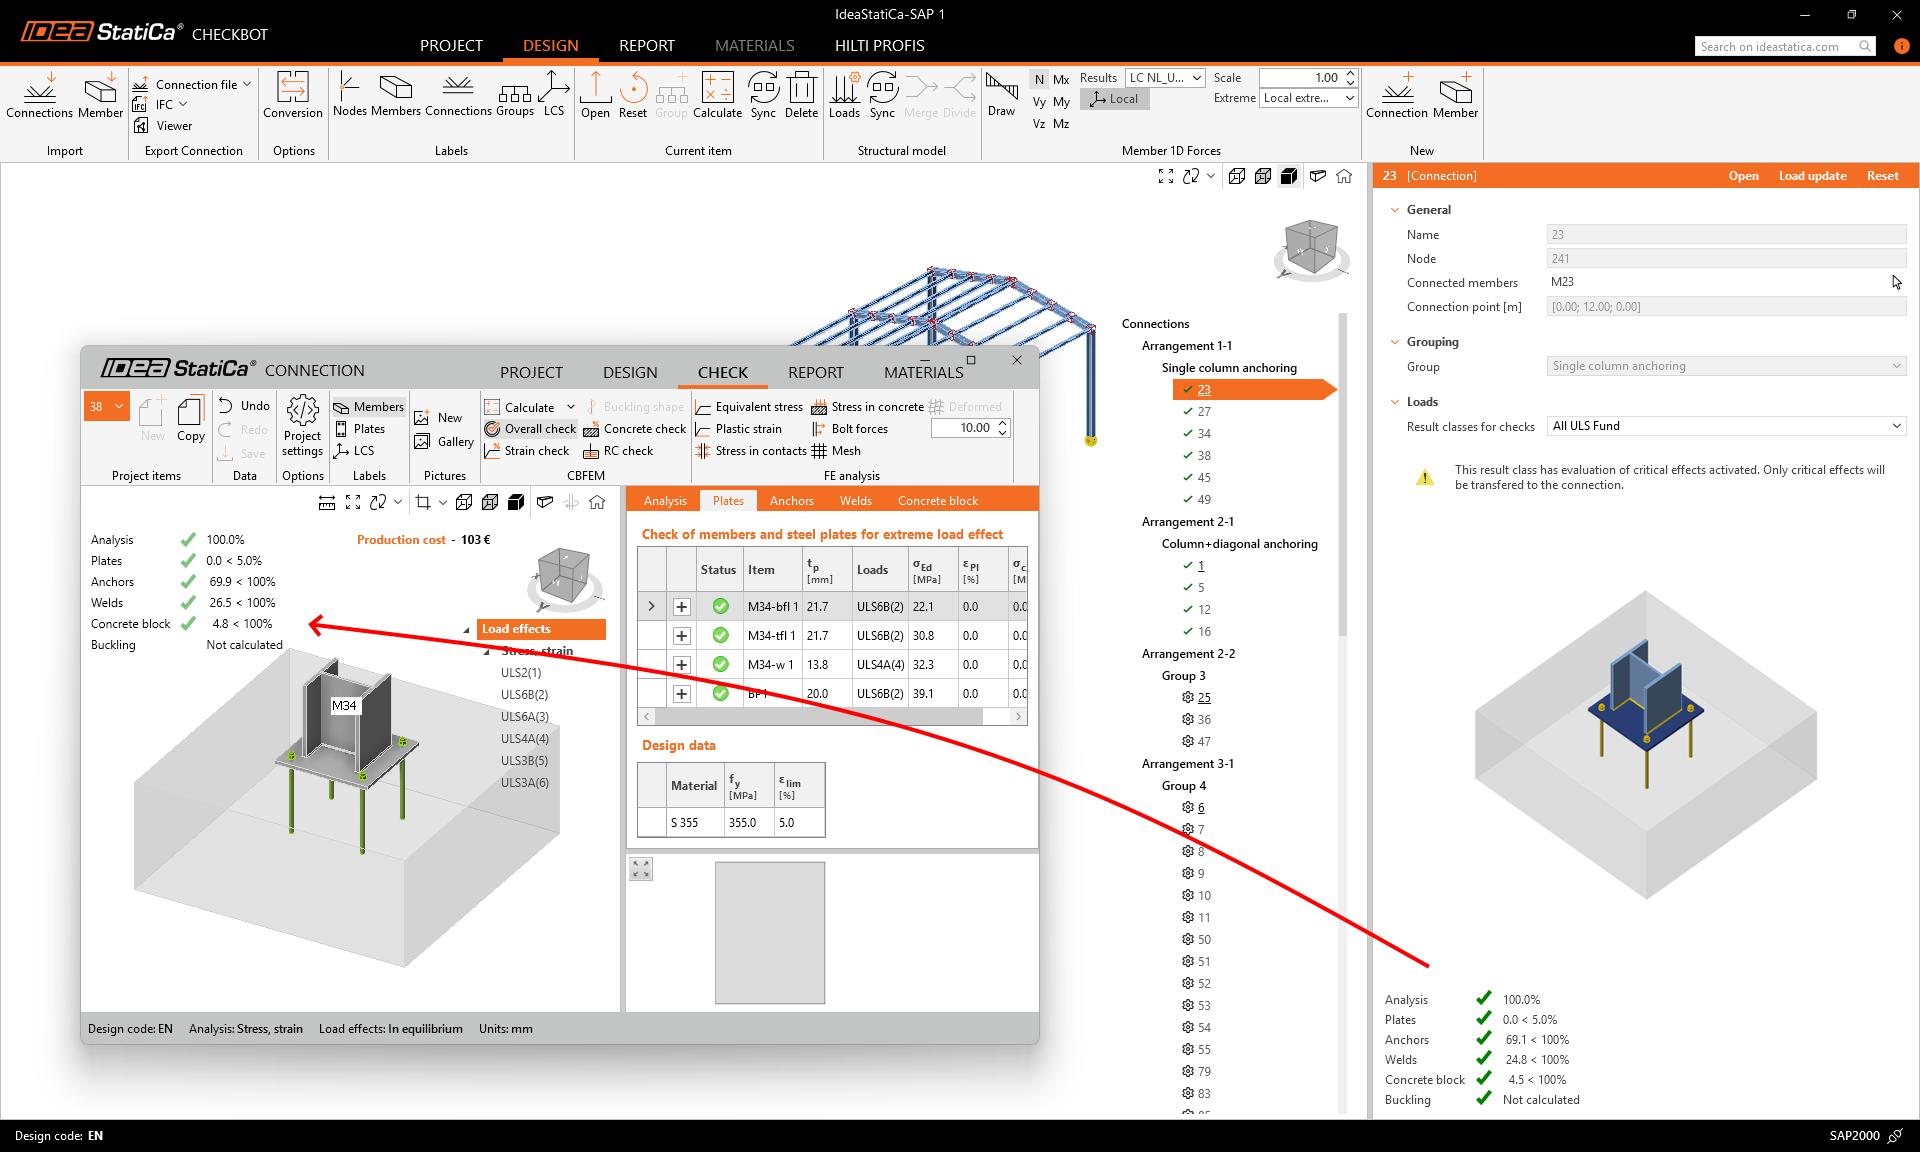
Statutes are added for easier navigation in the project so that nodes are distinguishable at a glance in both the tree list and the 3D scene. New statuses are:
- passing the code checks – a green box in the 3D scene and a green mark in the tree list
- failing the code checks – a red box in the 3D scene and a red cross in the tree list
- ready for calculation – a blue box in the 3D scene and a marked cog-wheel in the tree list
Smooth work with Checkbot and Connections
When a node is opened in Checkbot, a new window with the lite version of the Connection app is displayed. The Connection app can stay open, and it refreshes when you open other nodes from Checkbot, thus, you save time from repeatedly opening and closing the Connection app.
Just save your connection and open the next one from Checkbot, and save time spent by Connection lite starting.
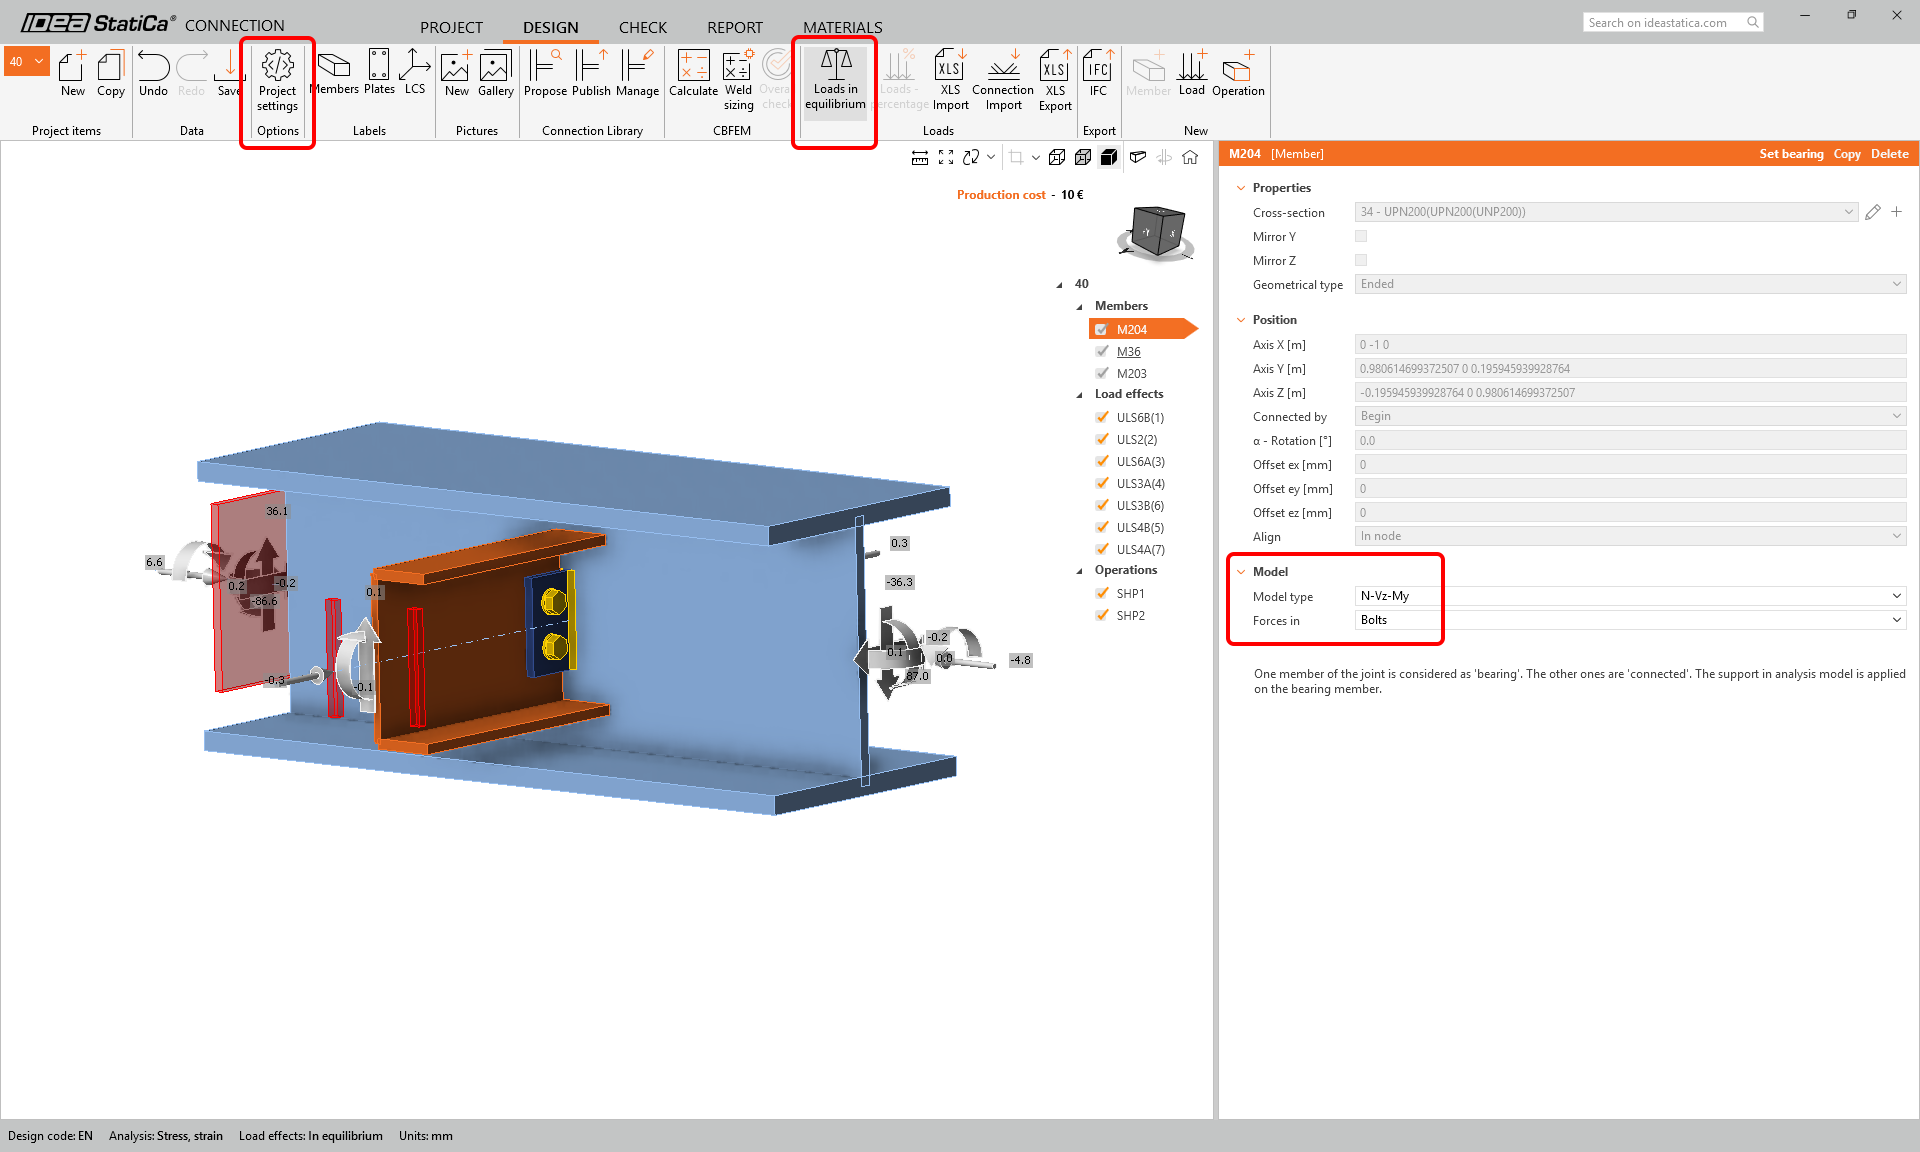
Consistent settings of Reference and Child connections
All settings applied to a Reference connection are automatically applied in bulk to all Child connections in the same group. This prevents time-consuming adjustments for nodes one by one. This includes:
- Project settings (gamma factors, detailing check, cost calculation, etc.)
- Member settings (Model Type and Forces in, including position and connected member face)
- Bearing member
- Load in equilibrium
Calculation results stored in Checkbot
The results calculated for connections and members within a Checkbot project have been merged into one database persistently stored in the project folder. All apps interacting with the project share this one result database.
This prevents situations when the results and code-checks from already completely calculated projects in Checkbot disappeared and had to be recalculated, or situations when results in Checkbot were missing when opening nodes in the Connection app. The same mechanism applies to members opened in the Member app.
Released in IDEA StatiCa version 25.0.
Bulk calculation progress bar and cancel
When calculating multiple connections in Checkbot, users can track the status on the right side of the application footer. Here, the currently analyzed connection is displayed together with the number of connections already calculated and the percentage of the overall progress. The percentage step is per connection, e.g., for two connections, the steps are 0%, 50%, and 100%.
In the tree list, the currently calculated connection is tagged with the spinner icon, and the connections waiting for the calculation are tagged with the hourglass icon.
The Cancel button terminates the calculation of the current connection and all the connections waiting for the calculation.

Released in IDEA StatiCa version 25.1.
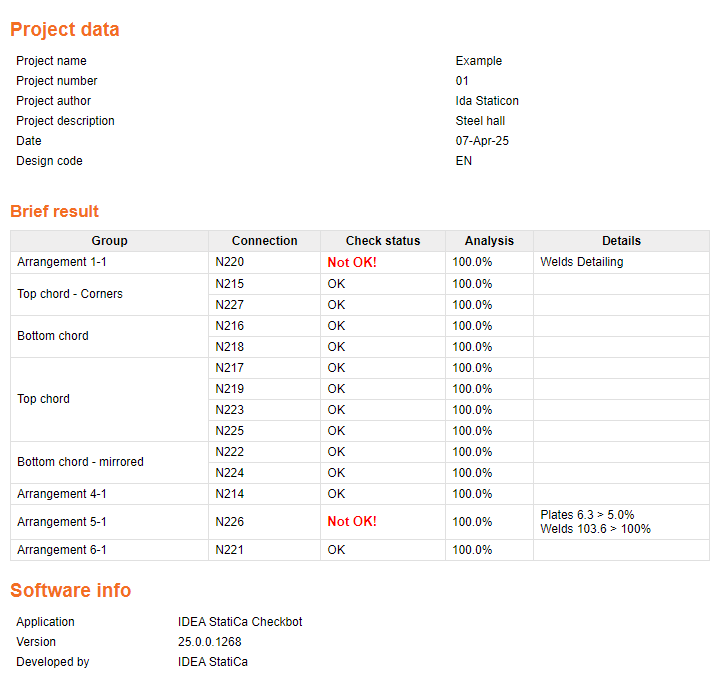
Bulk report for all connections in Checkbot
The Report tab is available in Checkbot in the same format as in the Connection app. The report can be generated for all connections in the project at once or for selected connections only and can be saved in PDF or DOC format for further editing or printed out directly.

When the Generate command is executed, Checkbot also calculates all the selected non-calculated connections, and the report is composed of the single connection reports one by one. Depending on the size of the project, this might take several minutes for the detailed type of report.
Types of report
There are three variants of the report per the desired level of detail:
- The Brief type of report is a super short version that includes the project description (defined in the backstage menu) and the simple results tab.
- The One Page shows the brief report part first (project description, brief results tab) and a composition of short reports for each connection, including the basic information only, results, and a representative picture.
- The Detailed type of report includes the brief report part first (project description, brief results tab) and a composition of full reports for each connection, including code equations, bill of materials, pictures, sketches, and cost estimations.
Settings for the report in Checkbot
The user can adjust the report scope in the same way as in the Connection app. Each item in the tree list can be turned on/off in order to be included or excluded from the report. Also, each item has its own settings that can be further modified.
Project info
- Edit and fill in the project name and other identification.
- Add a User paragraph for the whole report, a text field and pictures at the beginning of the report.

Connections
- Turn on/off the Code setting (tab of references to the used codes).
- Change the Report language.
- Modify Project item settings for the Detailed type of report, drives the content of the report, whether to include formulas, explanations, bill of materials, and other data.

Group
- Add a User paragraph for the selected group, a text field and pictures at the beginning of the part for the selected group.

Set the default Report settings
Users can adjust the default report settings in the Project settings and use them across all current and future projects to keep the consistent report content and format.
To change the report defaults, open the Project settings from the Launcher app, do the modifications and click Save as default.

Alternatively, users can open the Project settings from the Design tab in the Connection app and save the report's current settings they are using in the current project as the defaults.

The report settings can also be exported from the Project settings to a JSON file using the Export command and shared with another user.

The factory default settings can be reset with the commands Load metric defaults or Load imperial defaults in the Project settings.
Released in IDEA StatiCa version 25.1.