
Diseño estructural de un extremo rebajado con abertura (EN)
1 Nuevo proyecto
Comience iniciando IDEA StatiCa y seleccione la aplicación Detail. Cree un nuevo proyecto con el que puede comenzar con una selección de la clase de hormigón adecuada C40/50 y recubrimiento de 30 mm. Luego continúe con la topología 2D de Elementos. En las plantillas de Elementos 2D, seleccione Extremo rebajado, una sección transversal.
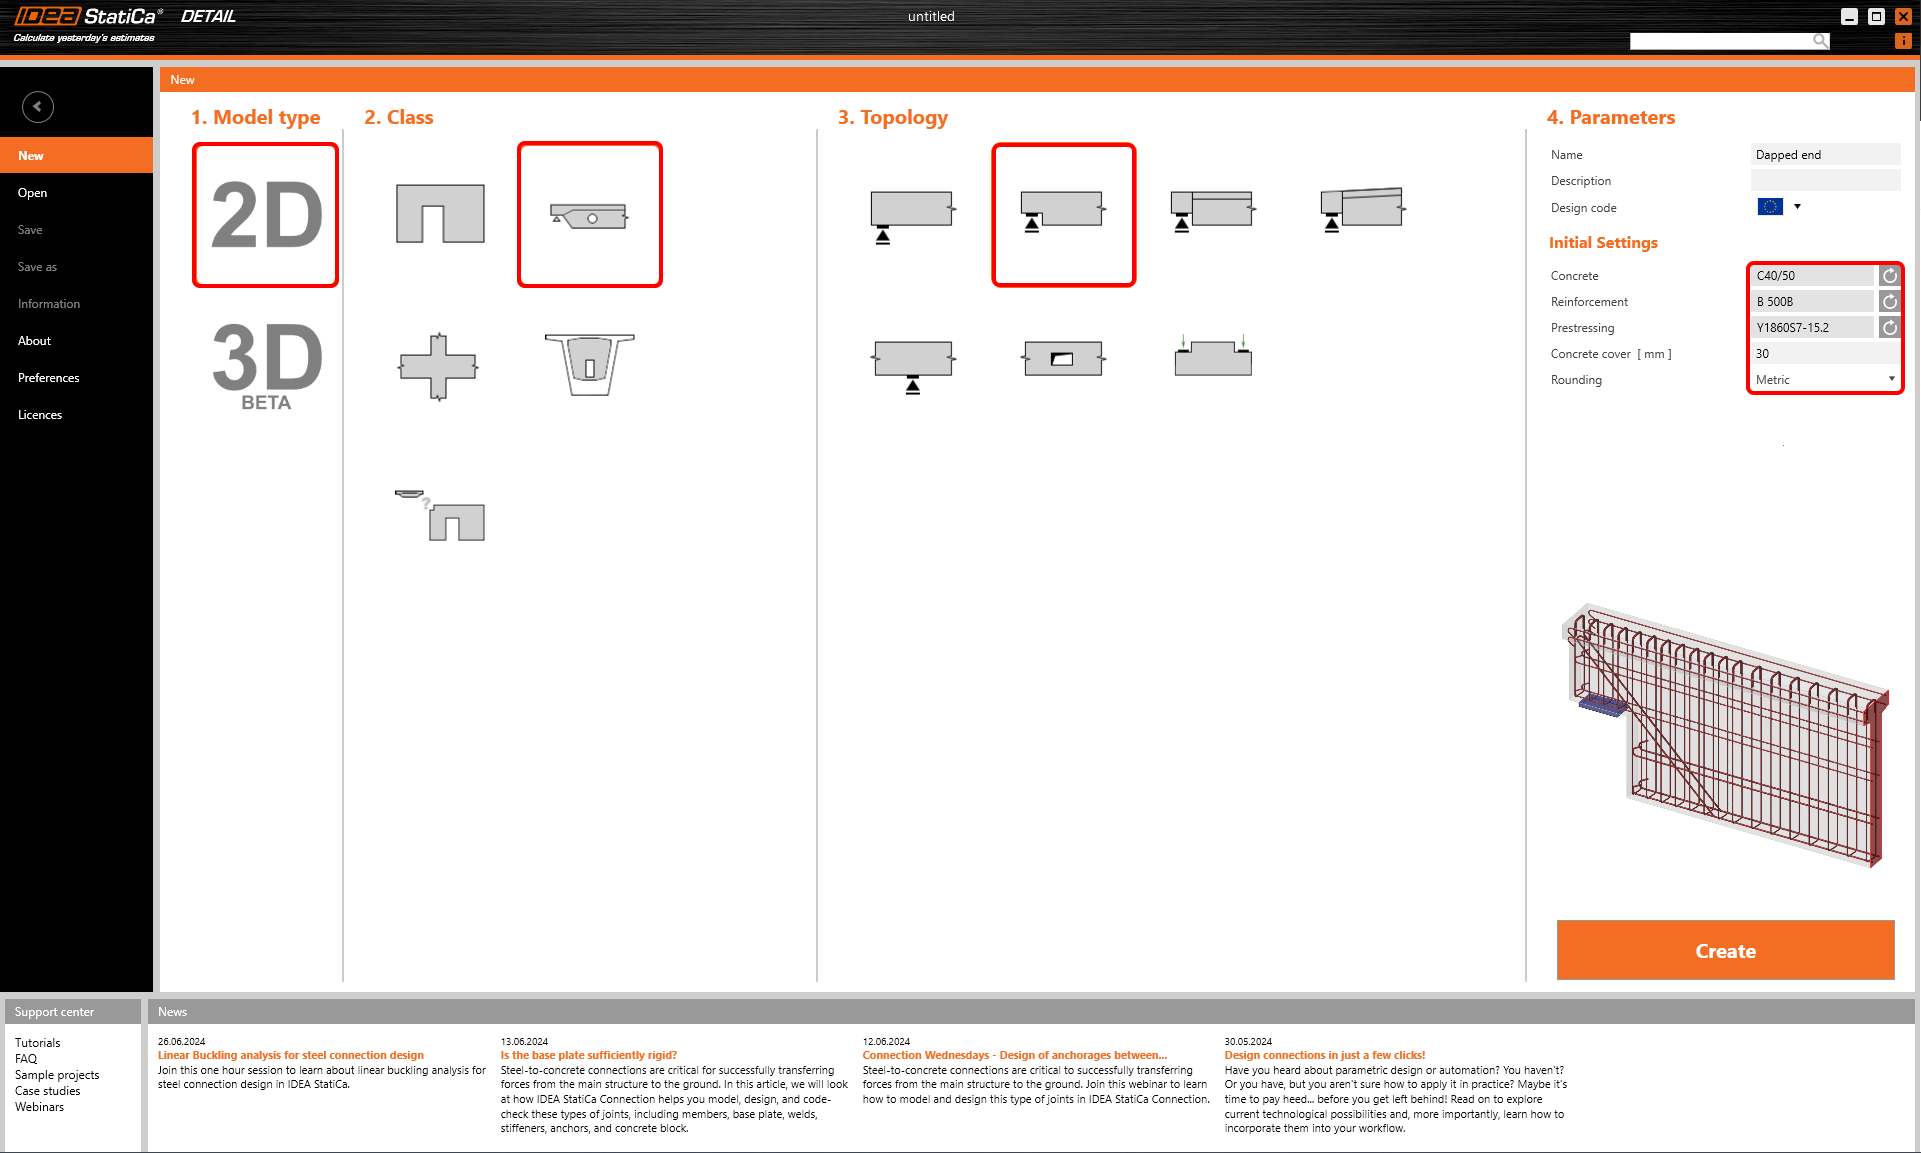
Después de esto, una plantilla predefinida cargará la geometría y la armadura básica en nuestro modelo.
2 Geometría
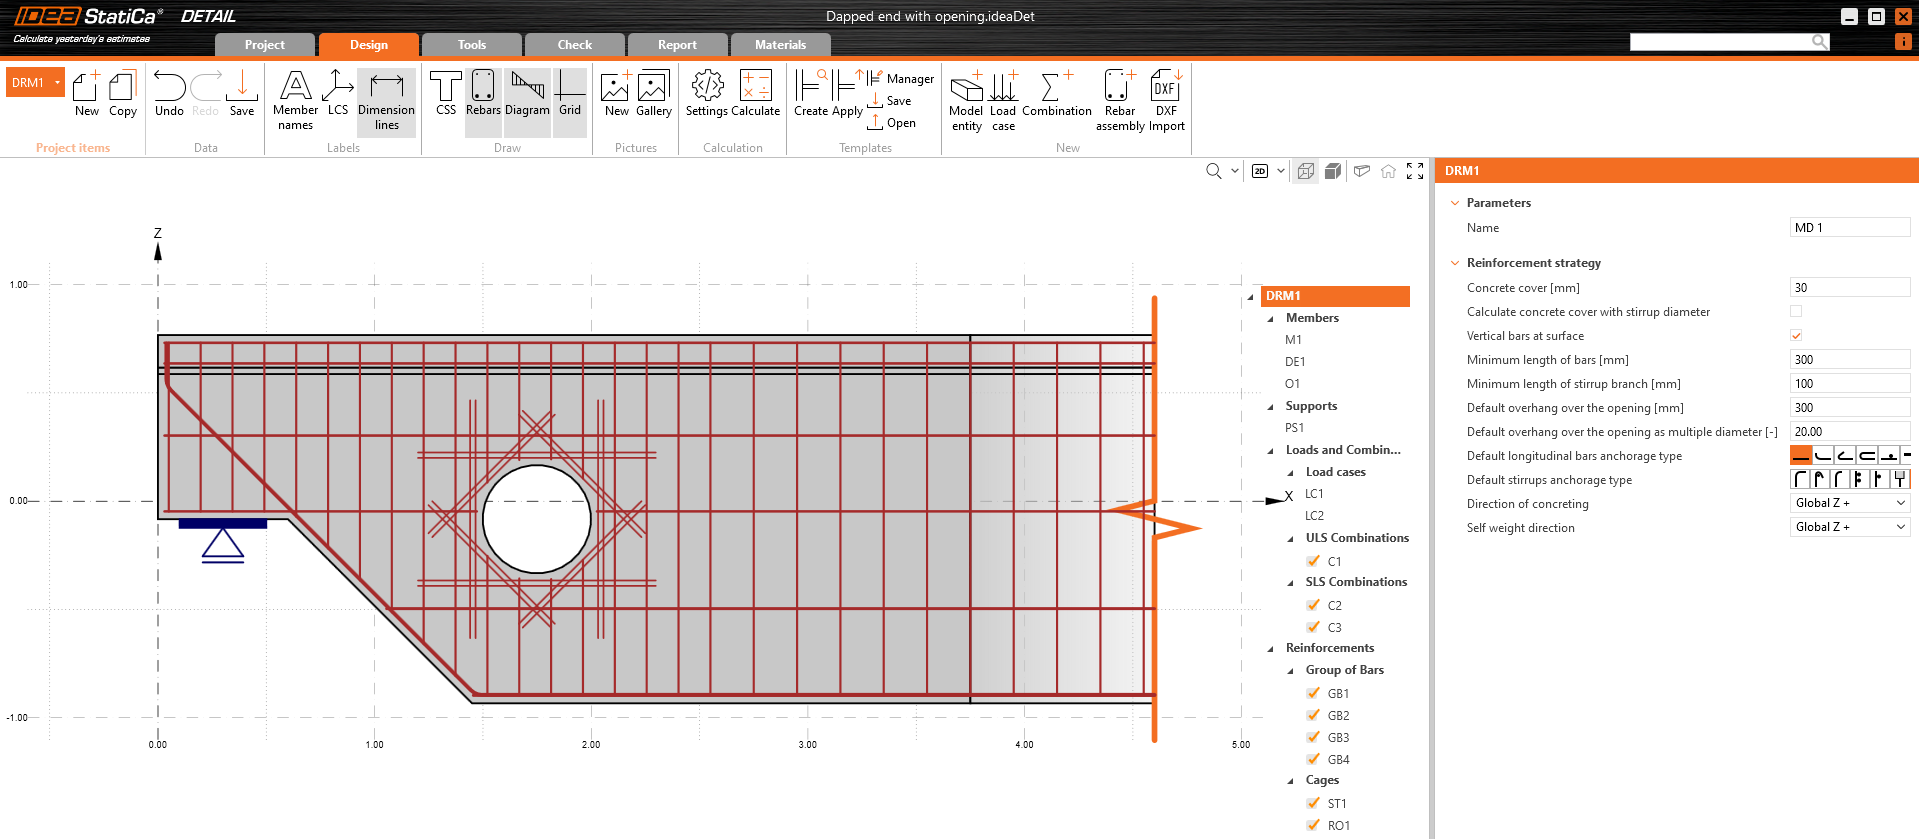
En este ejemplo, asegúrese de desmarcar la casilla de verificación para calcular el recubrimiento de hormigón con el diámetro del estribo.
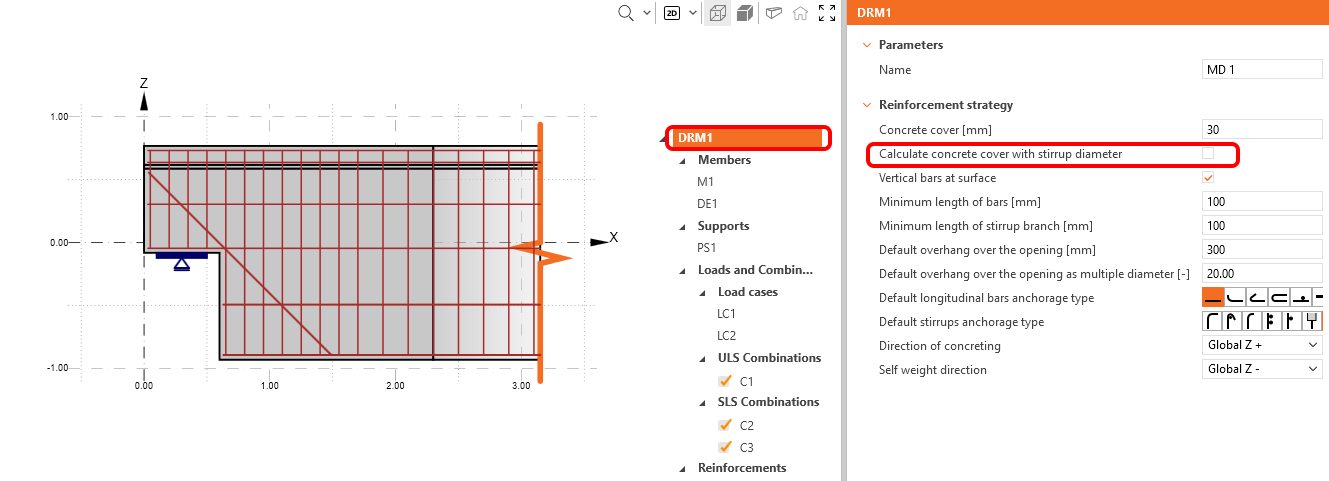
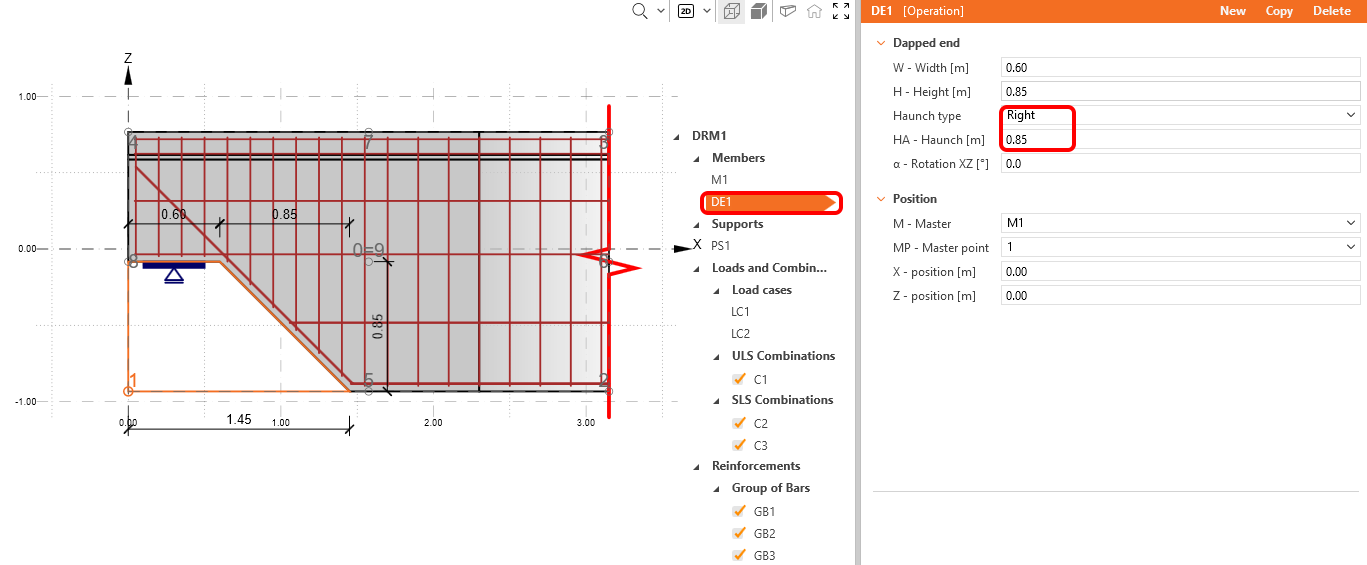
Comience con la modificación de la geometría. La plantilla ha cargado tres elementos: el elemento M1, el extremo rebajado DE1 y el apoyo puntual PS1. Hacemos clic en DE1 y elegimos una cartela en el lado derecho con un ancho de 0,85 m.
Continúe con la adición de una abertura. Para añadirla, haga clic en el botón de entidad del modelo y en el Modelo seleccione Abertura.
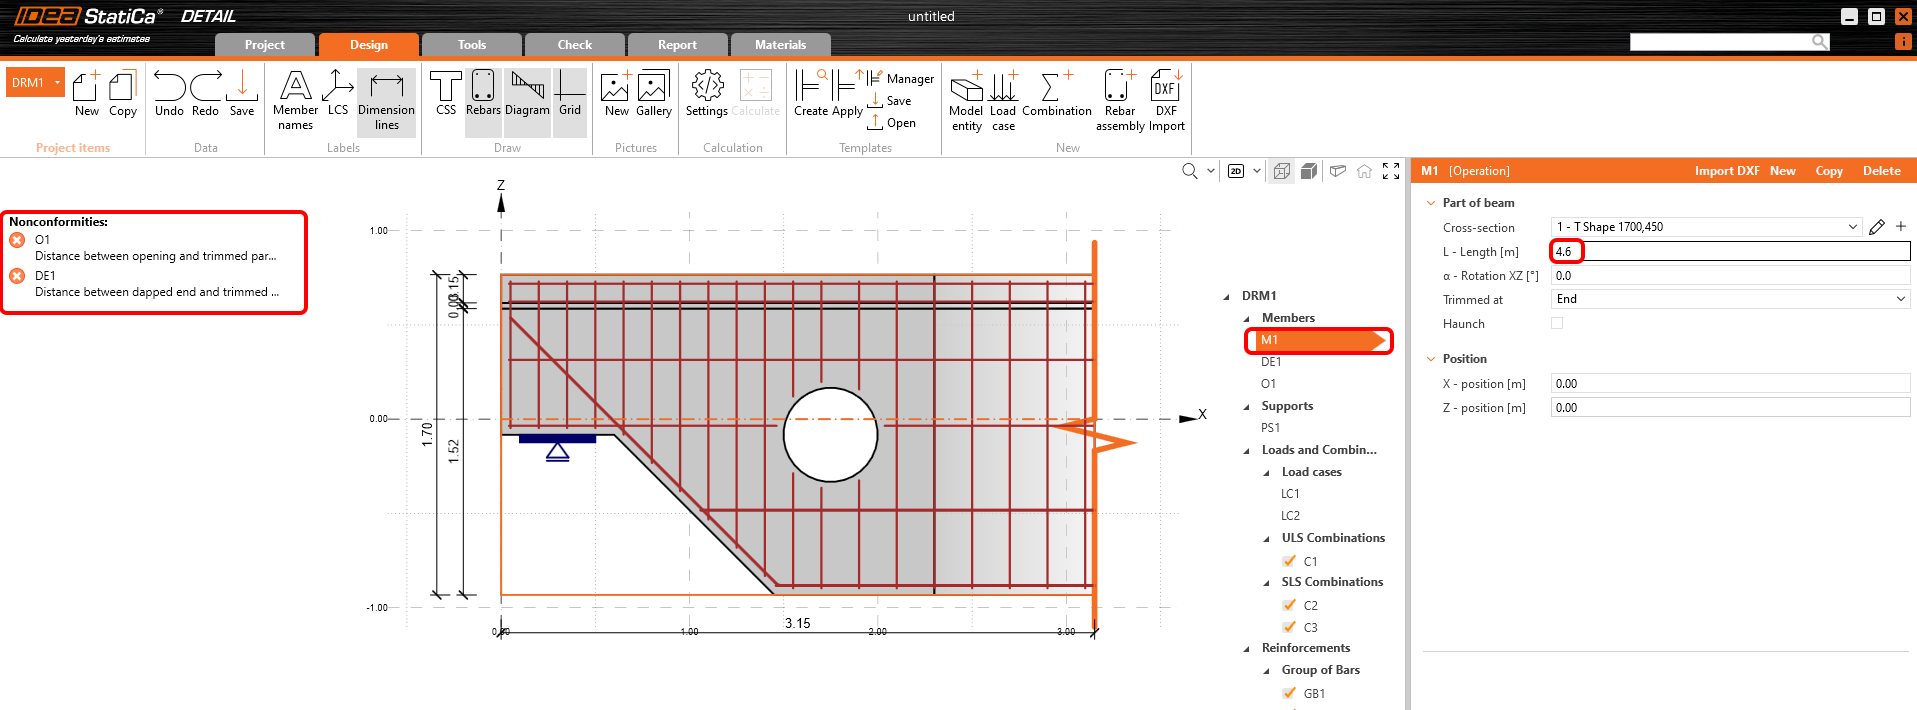
Cambie la forma de la abertura a Circular y el diámetro a 0,5 m. Para colocar la abertura en la posición deseada, utilice la relación entre el punto maestro y el punto de inserción. El componente maestro será M1 y el punto maestro nº 8, inserte el punto de la abertura también en el nº 8, y la distancia entre estos puntos en la dirección X será de 1,5 m.
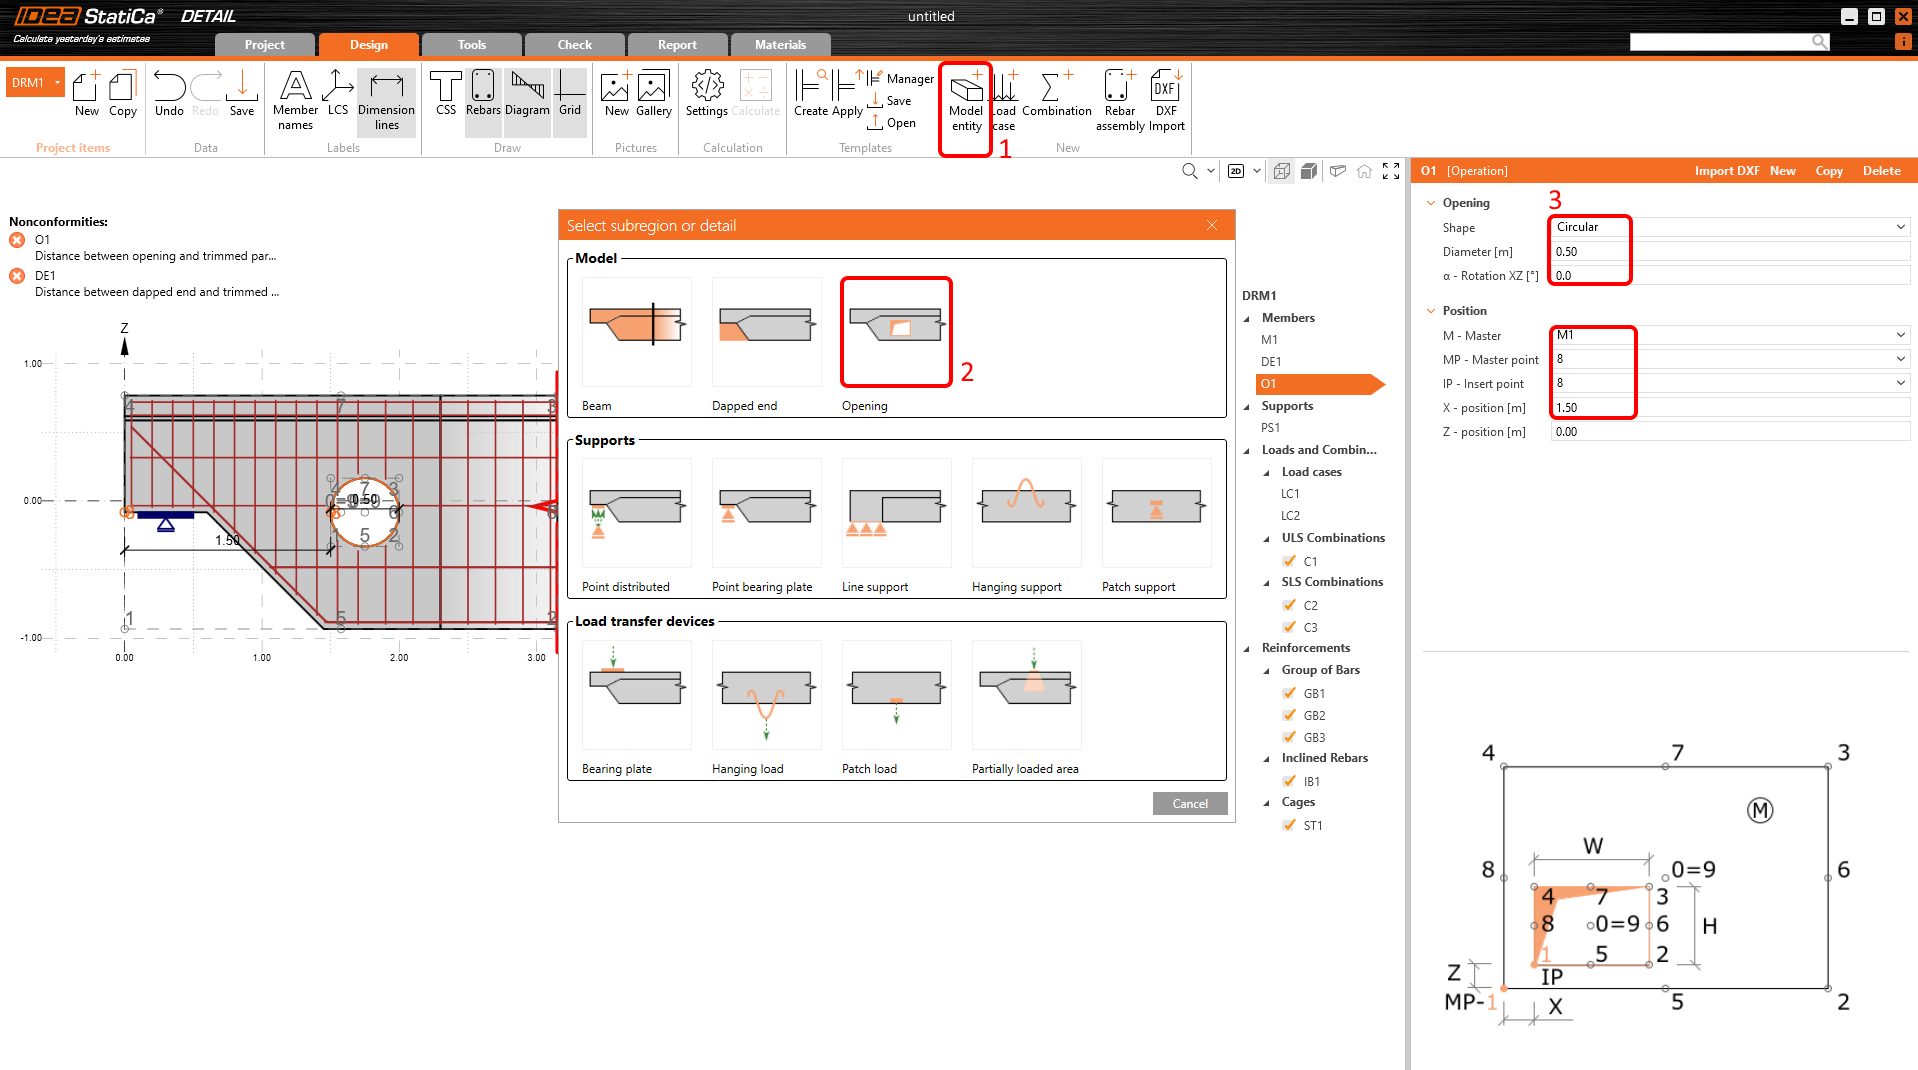
IDEA StatiCa Detail le advierte mediante mensajes de error que la longitud del detalle es insuficiente. El extremo recortado del detalle debe estar a una distancia de al menos 1,5*h de la última fuente de discontinuidad. En este caso, la fuente determinante es la abertura y la longitud suficiente del elemento es de 4,6 m. Todas las advertencias deberían desaparecer tras la elongación del elemento M1.
3 Cargas
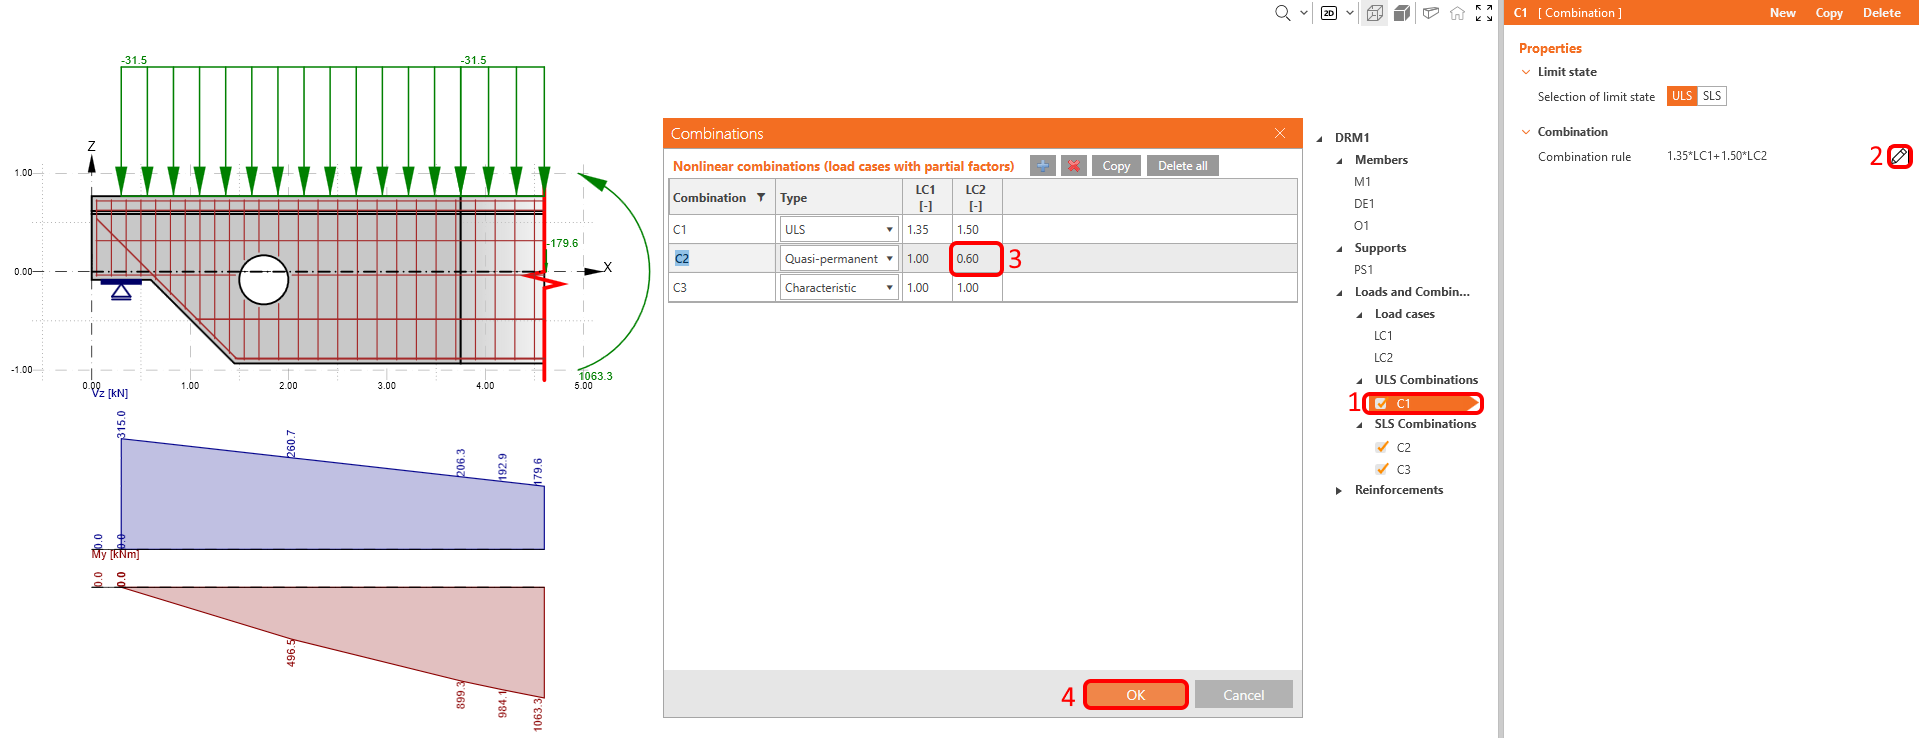
El software añadió automáticamente dos casos de carga y tres combinaciones no lineales. Necesita dos casos de carga para distinguir entre cargas permanentes y variables, y tres combinaciones para cubrir un ELU y dos ELS combinaciones (Característica y Cuasipermanente) para todas las verificaciones.
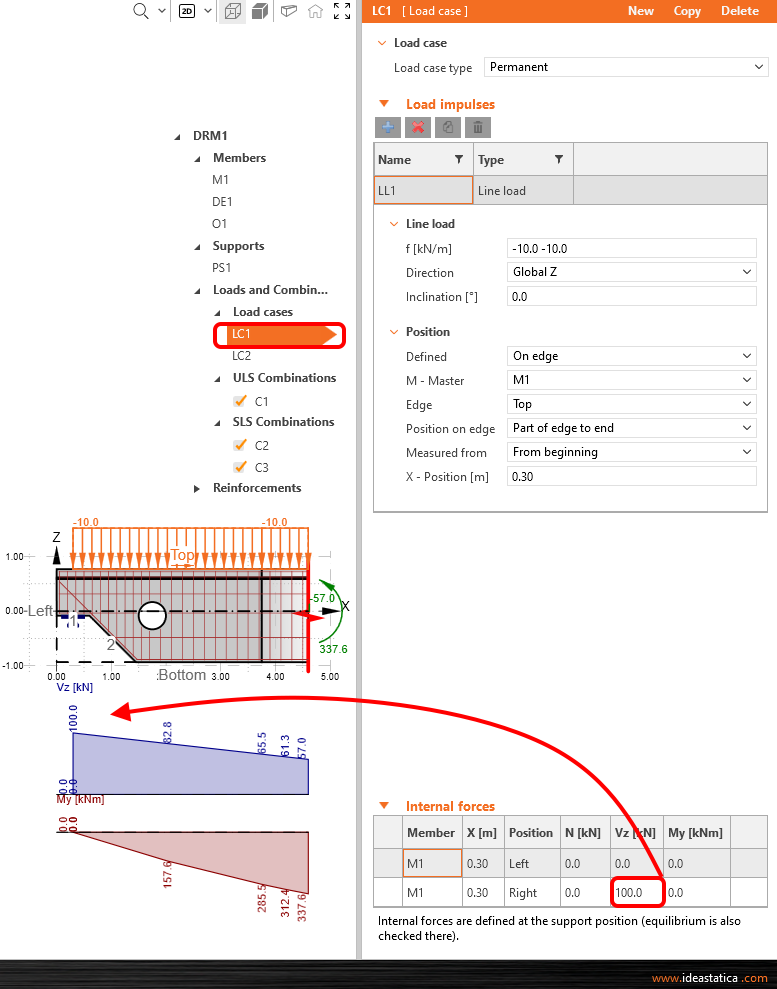
Modifique el caso de carga LC1 para efectos permanentes. Aplique la reacción como una fuerza cortante 100 kN Vz desde la posición derecha. Puede ver el cambio en el diagrama de fuerzas internas.
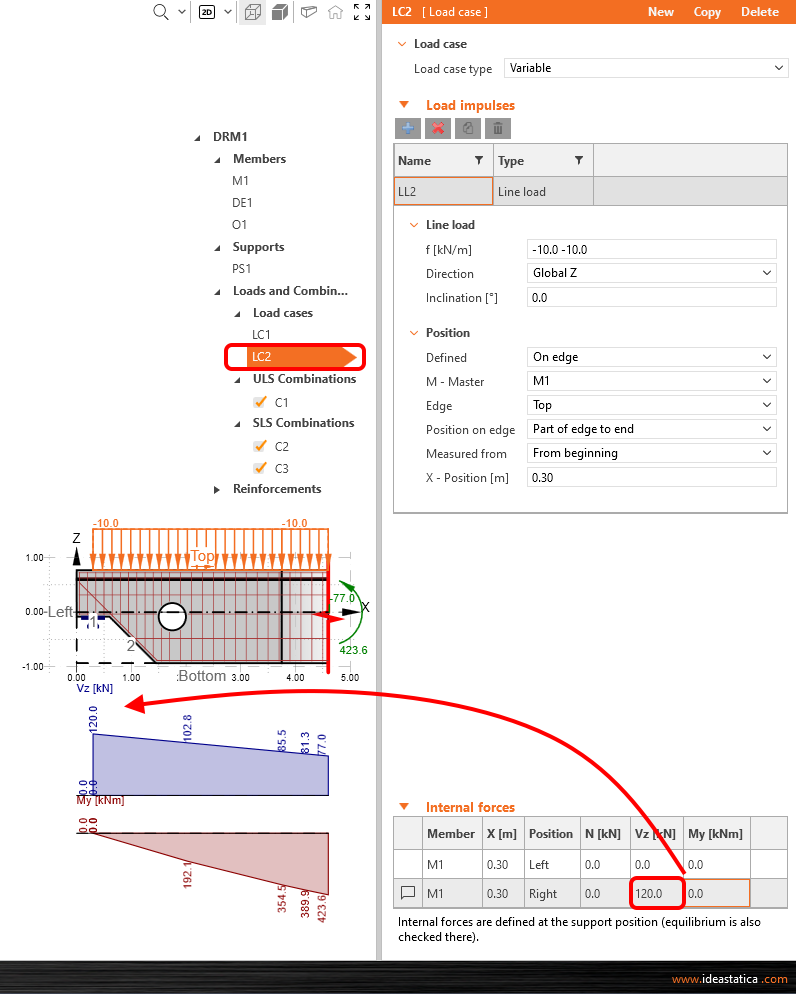
Cambie al caso de carga LC2 mediante el cuadro combinado y repita los pasos con valores de 120 kN Vz.
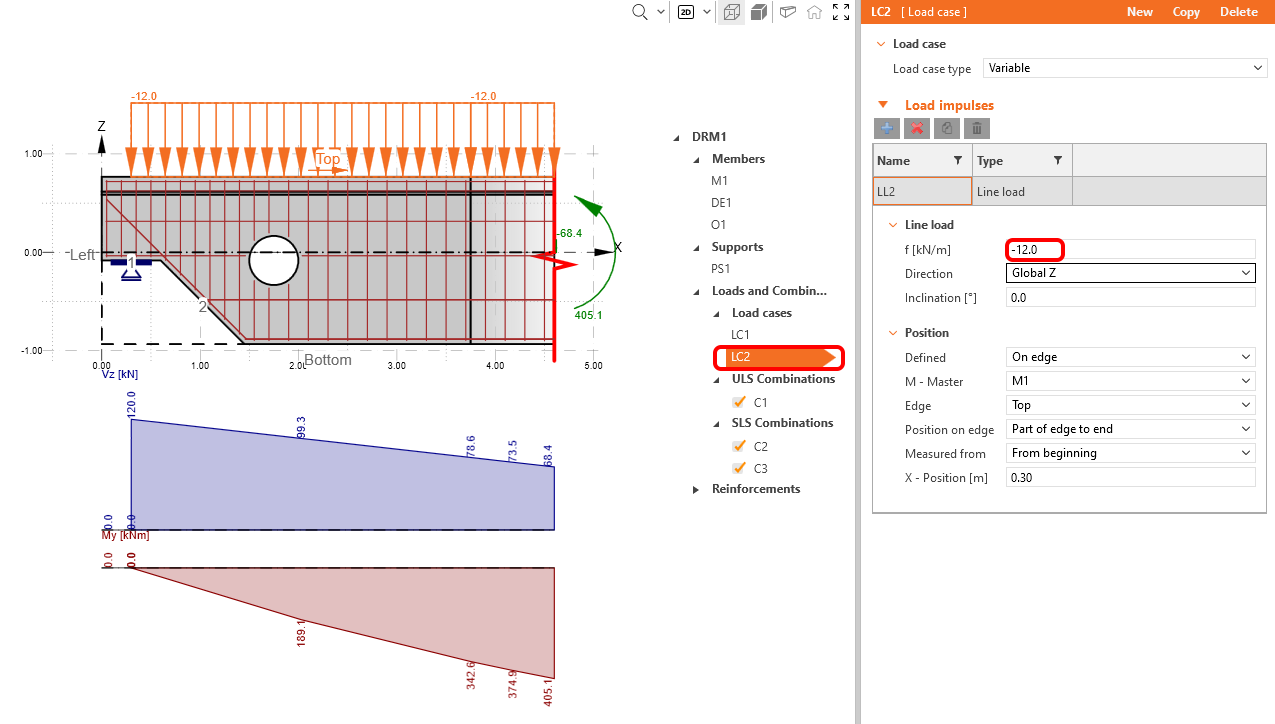
Como desea reducir los valores de las fuerzas internas en el extremo recortado, en LC 2 cambie el valor de la carga lineal a -12 kN/m.
El último paso en la definición de cargas será el cambio del coeficiente parcial para la combinación cuasipermanente CO2. Puede acceder al diálogo del coeficiente parcial desde cualquier combinación definida mediante el icono de lápiz junto a la regla de combinación. Cambie el coeficiente parcial de LC2 a 0,60.
4 Armadura
Para armar este modelo en particular, comience con una plantilla predefinida en IDEA StatiCa Detail y modifíquela. Antes de hacerlo, le gustaría ver cómo armarlo basándose en los resultados de las herramientas de diseño.
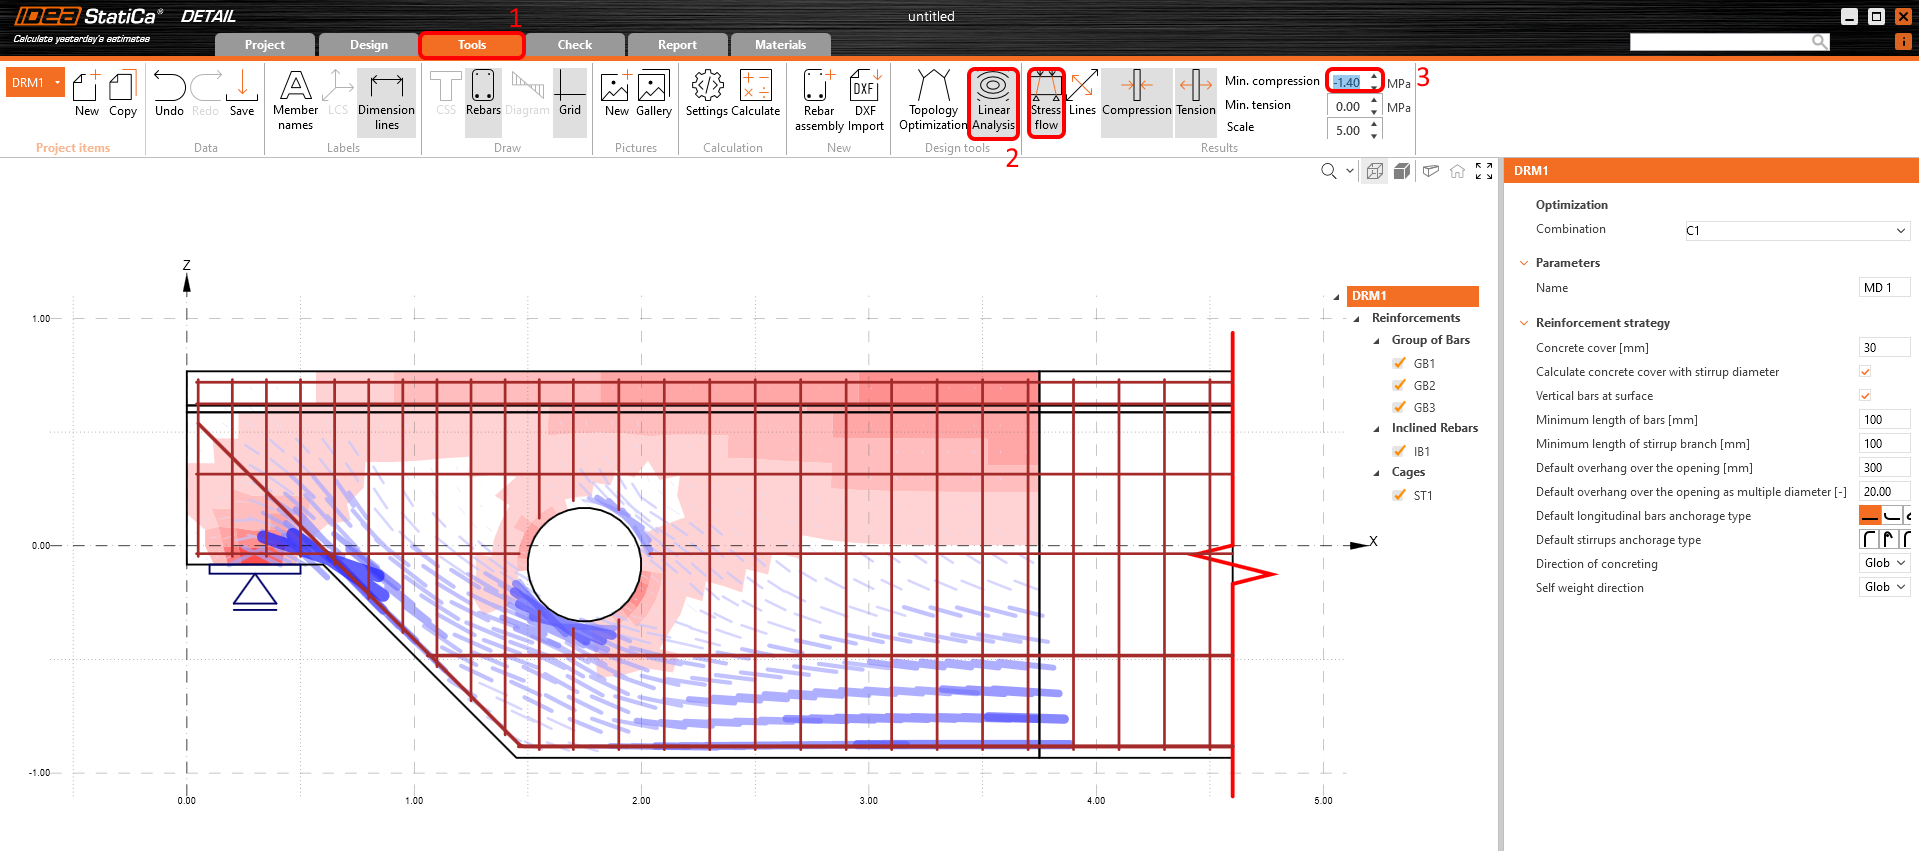
Haga clic en el icono de Análisis lineal para ejecutarlo. Para ver mejor los campos más comprimidos, puede aplicar un filtro de compresión de -1,4 MPa en el lado derecho de la cinta. Las áreas rojas representan compresión y las líneas azules muestran tracción. Estos son los resultados que puede ver:
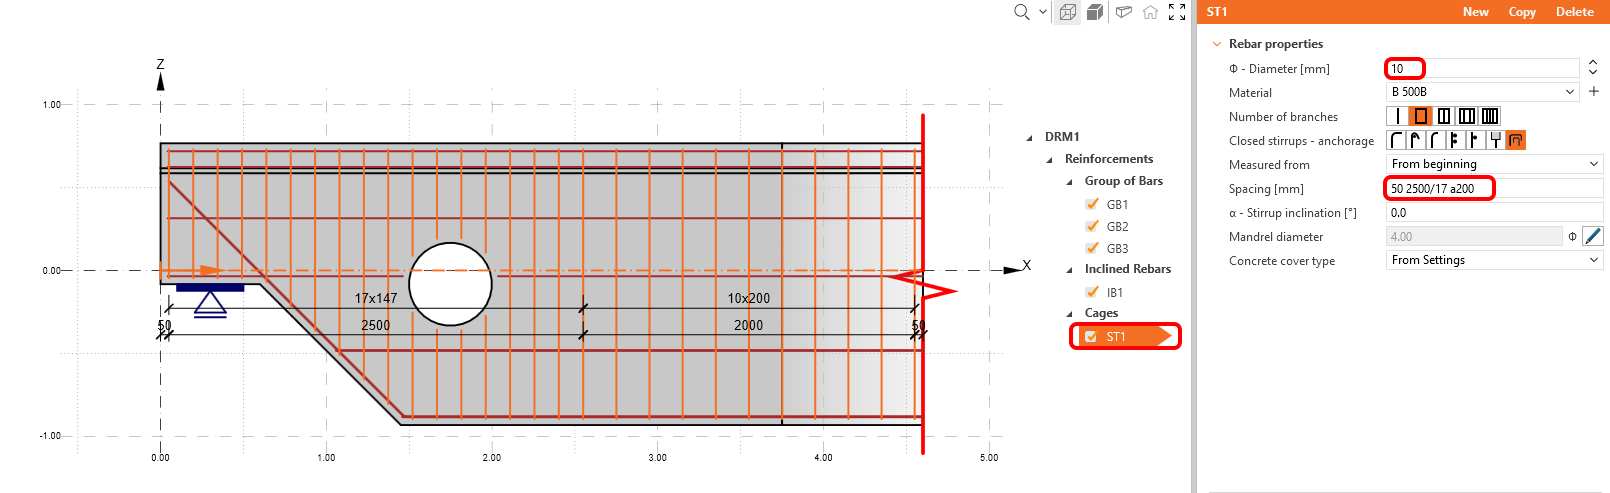
El primer elemento ST1 se utiliza para el modelado de estribos. Modifique el diámetro de los estribos a 10 mm y cambie las distancias entre estribos como 50 2500/17 a200. Como puede ver, puede combinar varias definiciones de distancias. Esto significa que el primer estribo se posiciona a 50 mm del borde, luego se llenan 2,5 m con una división de 17 y el resto se rellena con una distancia de 200 mm.
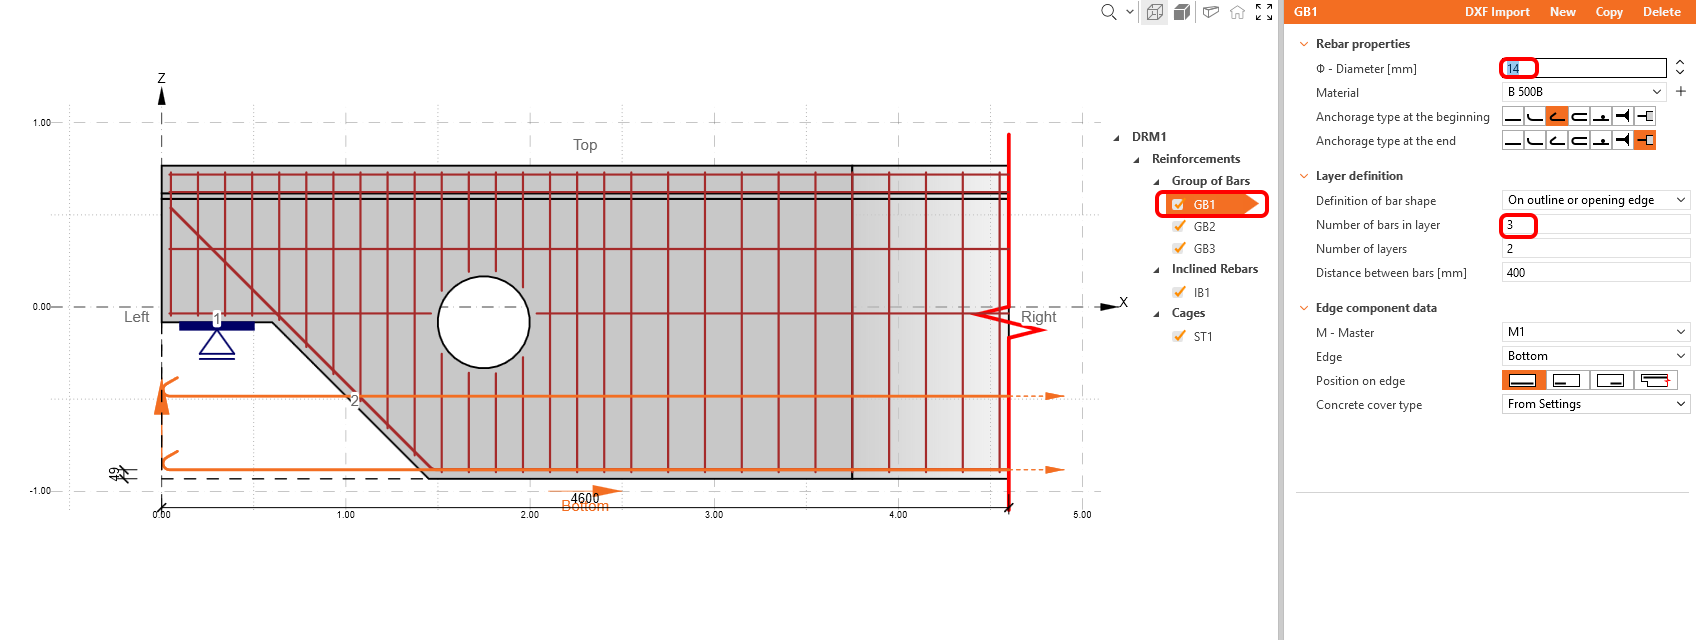
Cambie las propiedades del elemento de armadura GB1.
Reemplace el elemento de armadura IB1 por otro elemento de grupo de barras: primero elimine IB1.
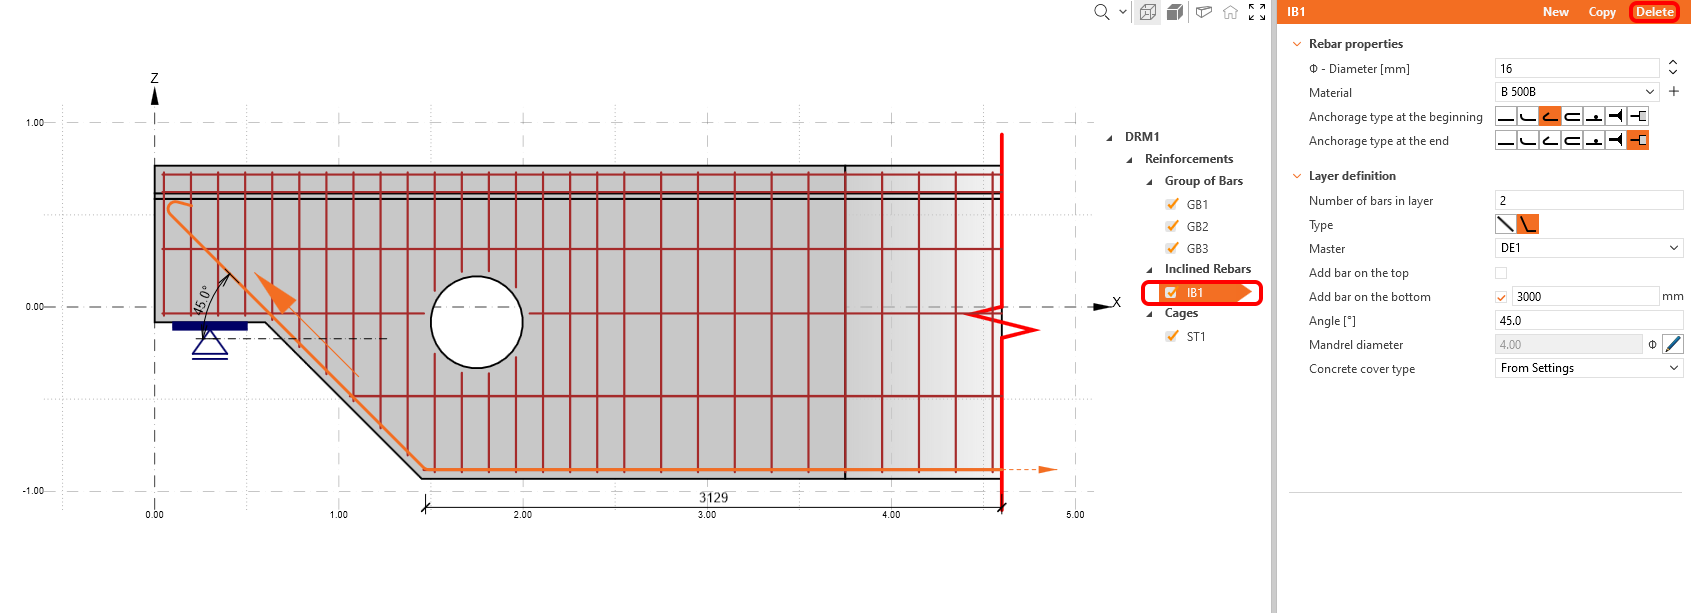
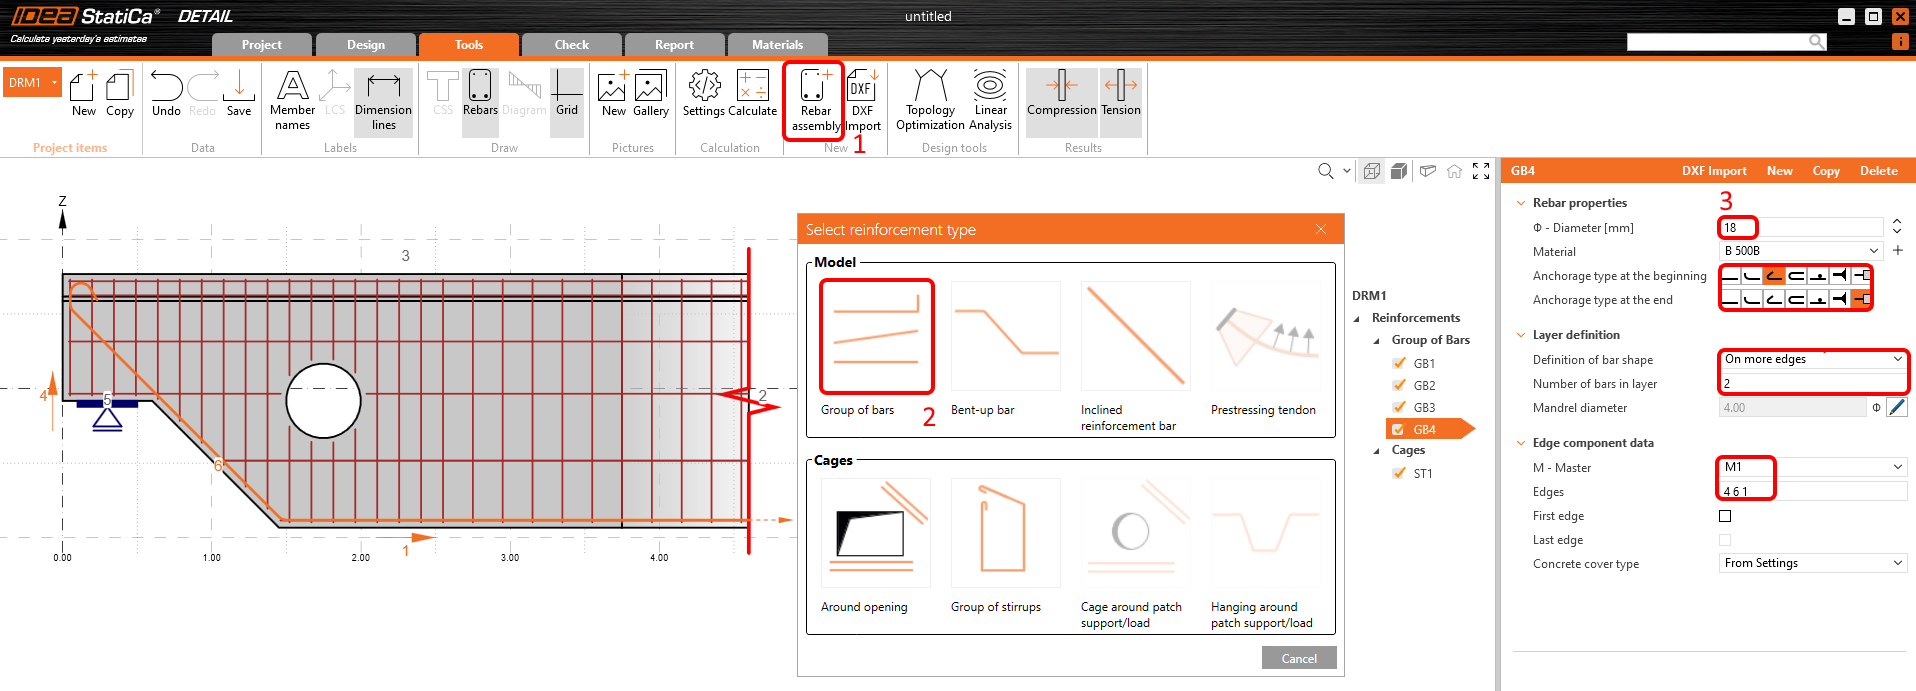
Para añadir un nuevo elemento de armadura, utilice el botón de entidad del modelo y seleccione el Grupo de barras.
Cambie la definición de la forma de la barra GB4 a En más bordes y luego ajuste el diámetro. A continuación, introduzca el orden correcto de los bordes para colocar la barra en la posición deseada.
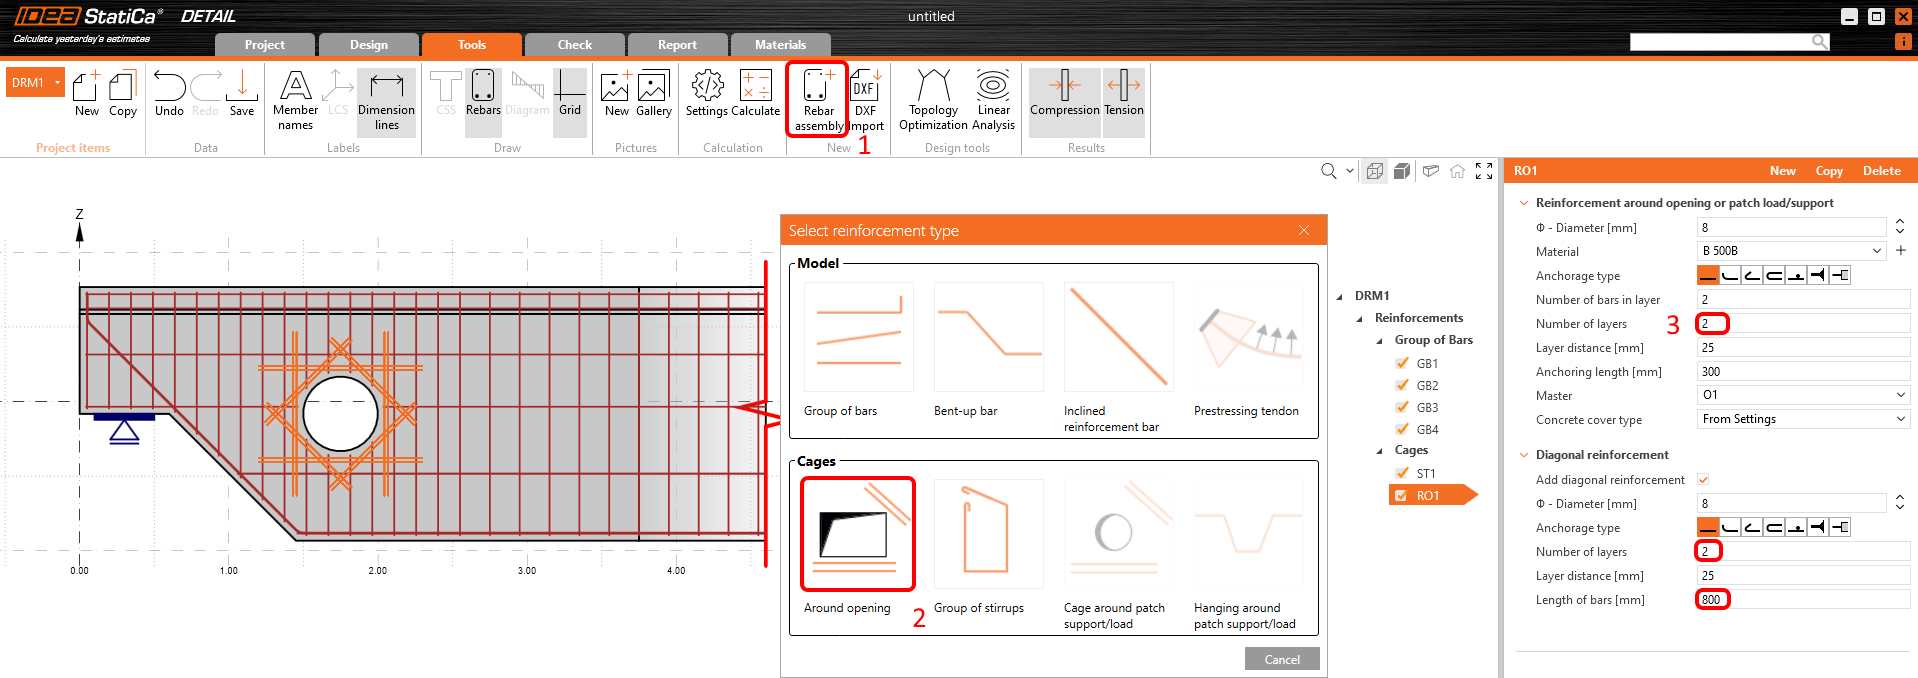
Ha añadido la abertura a la plantilla original y, por lo tanto, necesita añadir armadura alrededor de ella. De nuevo, pulse el botón de entidad del modelo y en Jaulas seleccione Alrededor de la abertura.
Modifique sus propiedades según la captura de pantalla.
Así es como debería verse su armadura final:
5 Cálculo y verificación
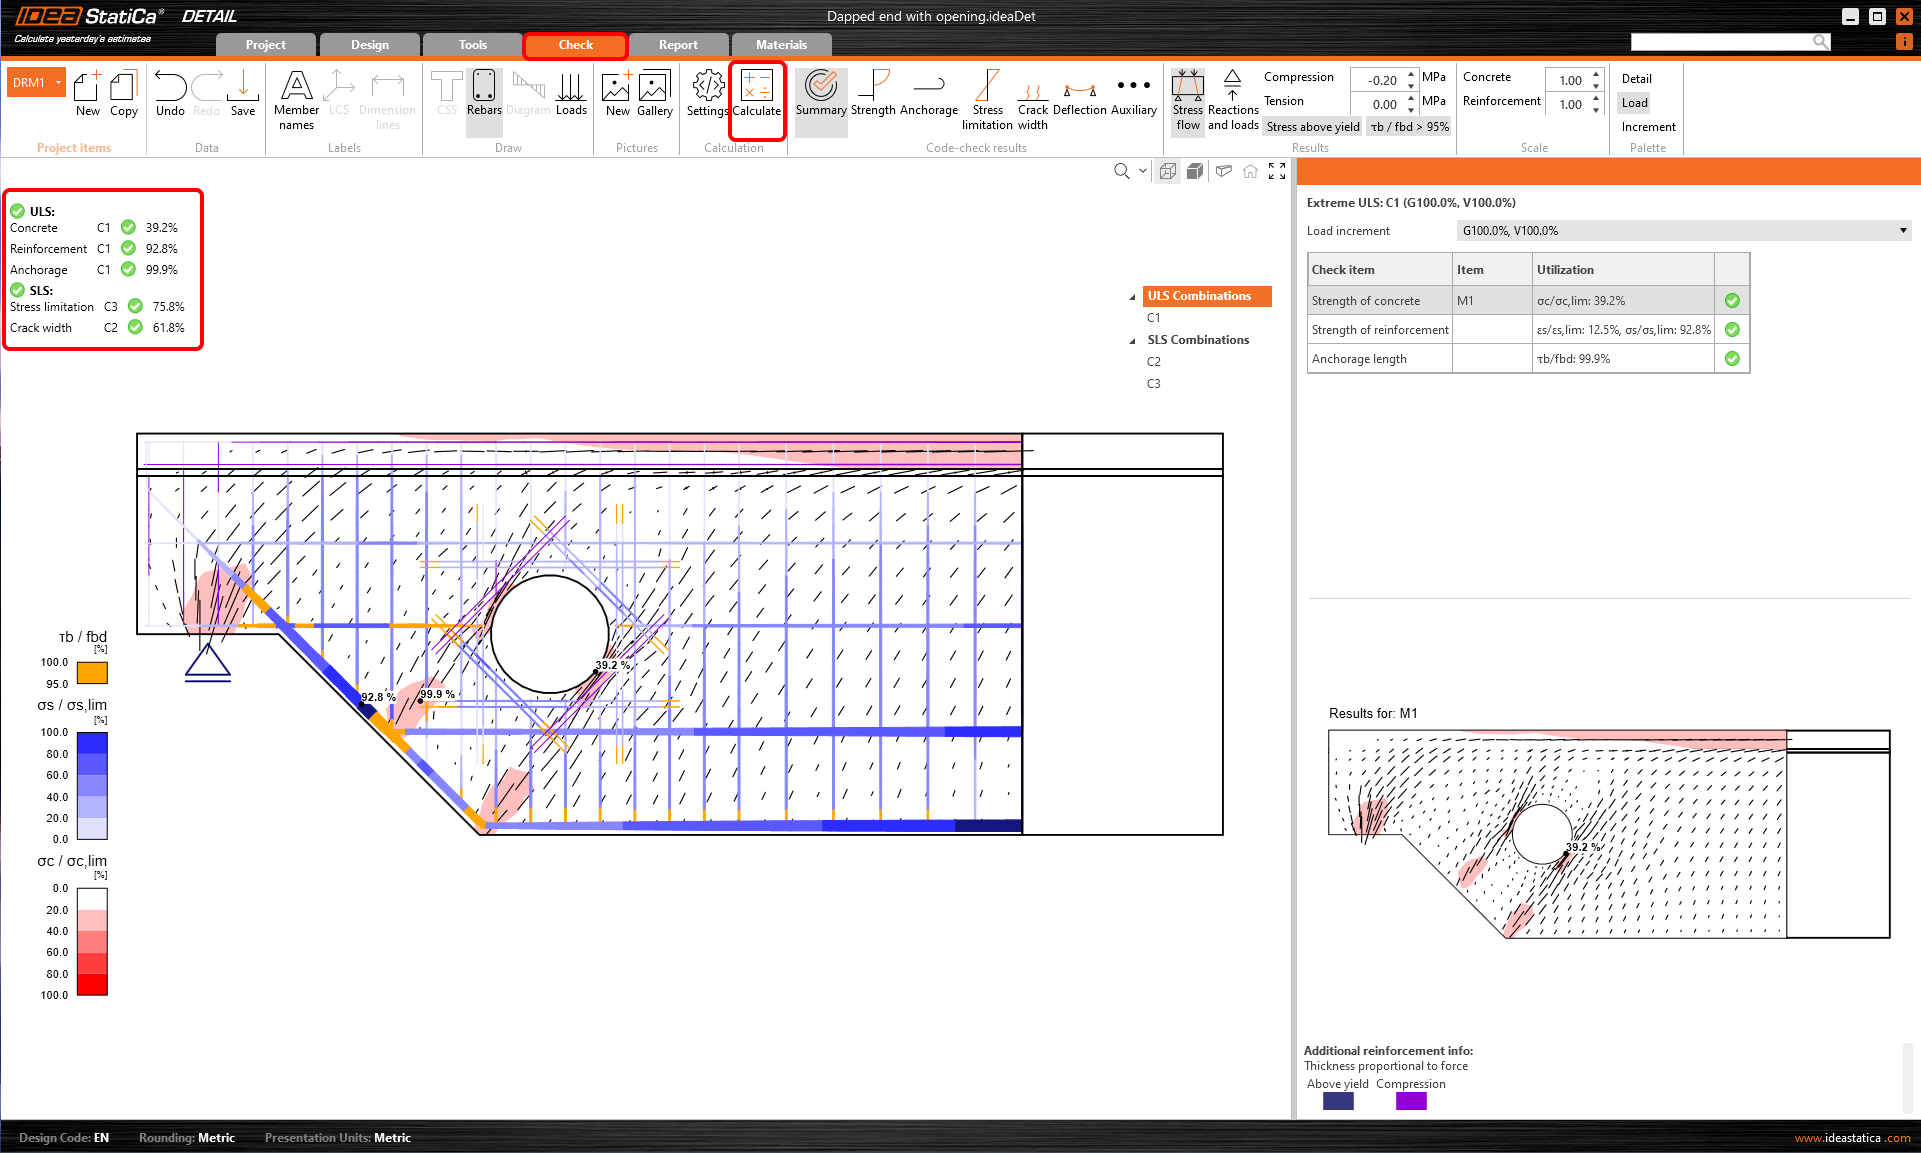
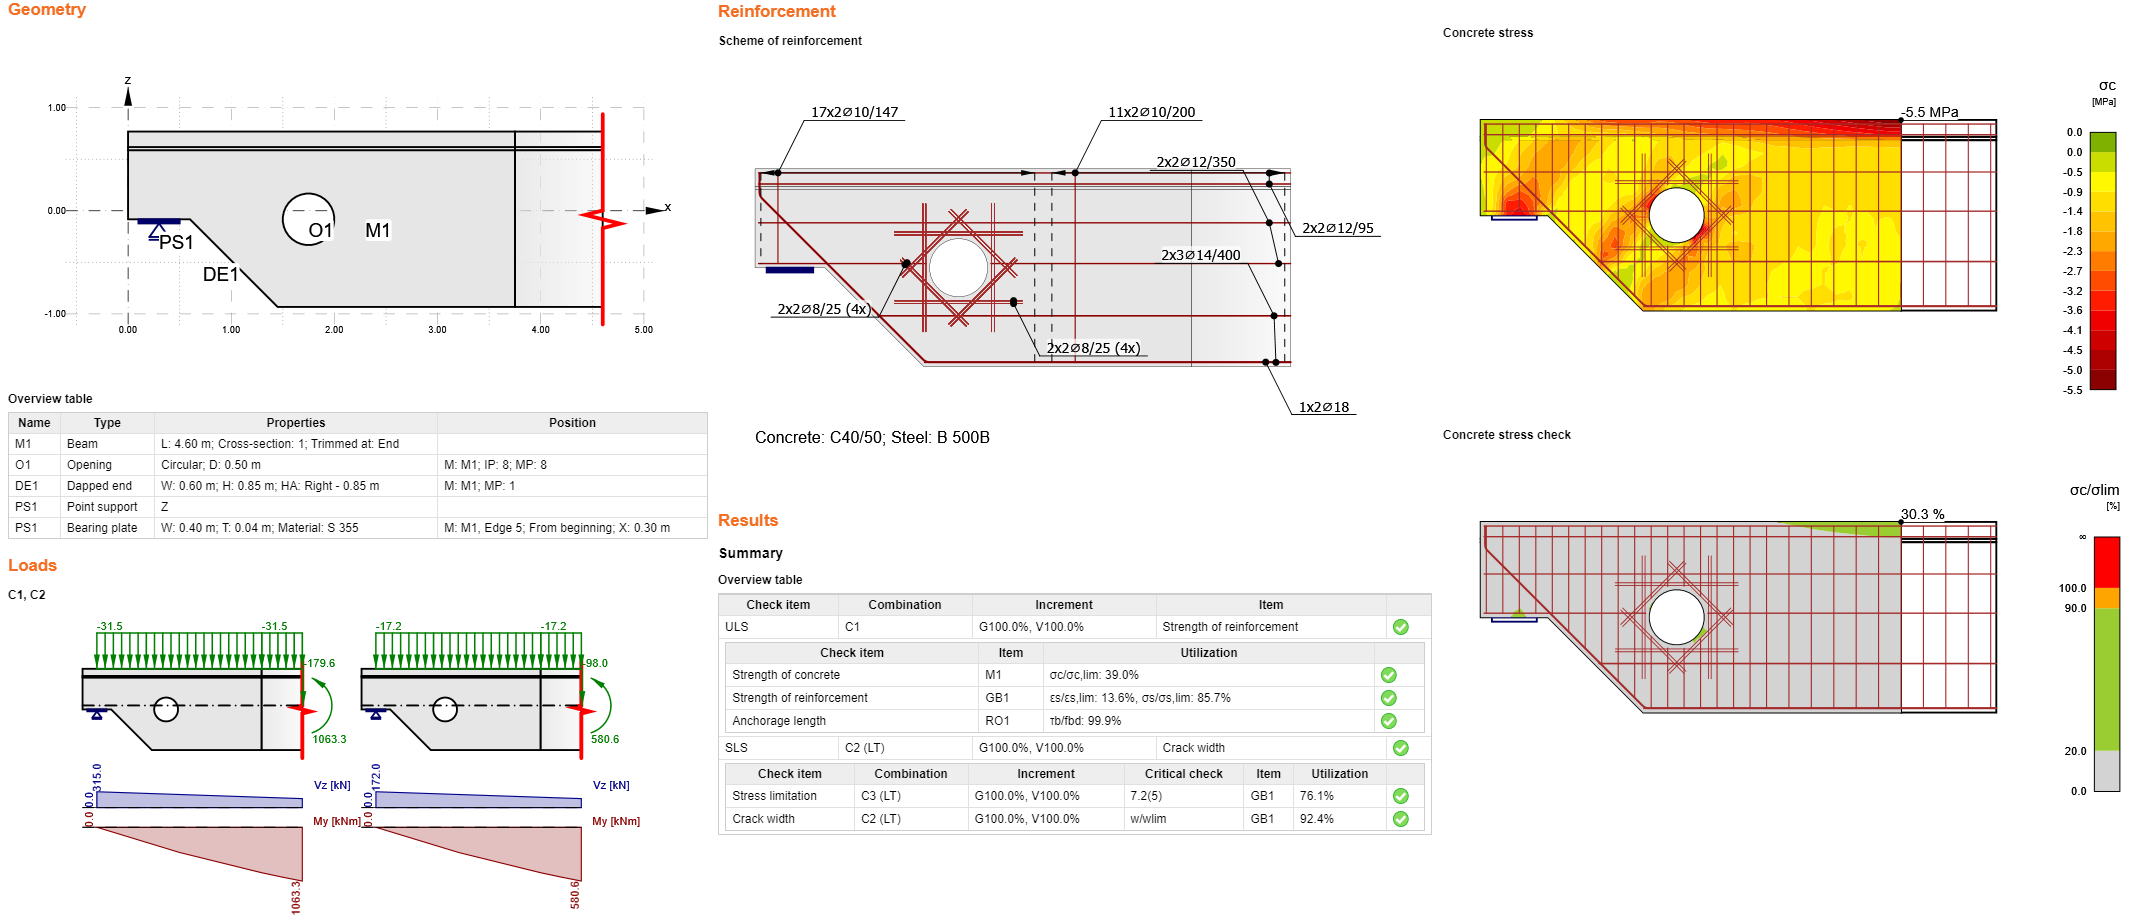
Inicie el análisis haciendo clic en Calcular en la cinta. El modelo de análisis se genera automáticamente, se realizan los cálculos y puede ver el resumen de las verificaciones mostrado junto con los valores de los resultados de las verificaciones.
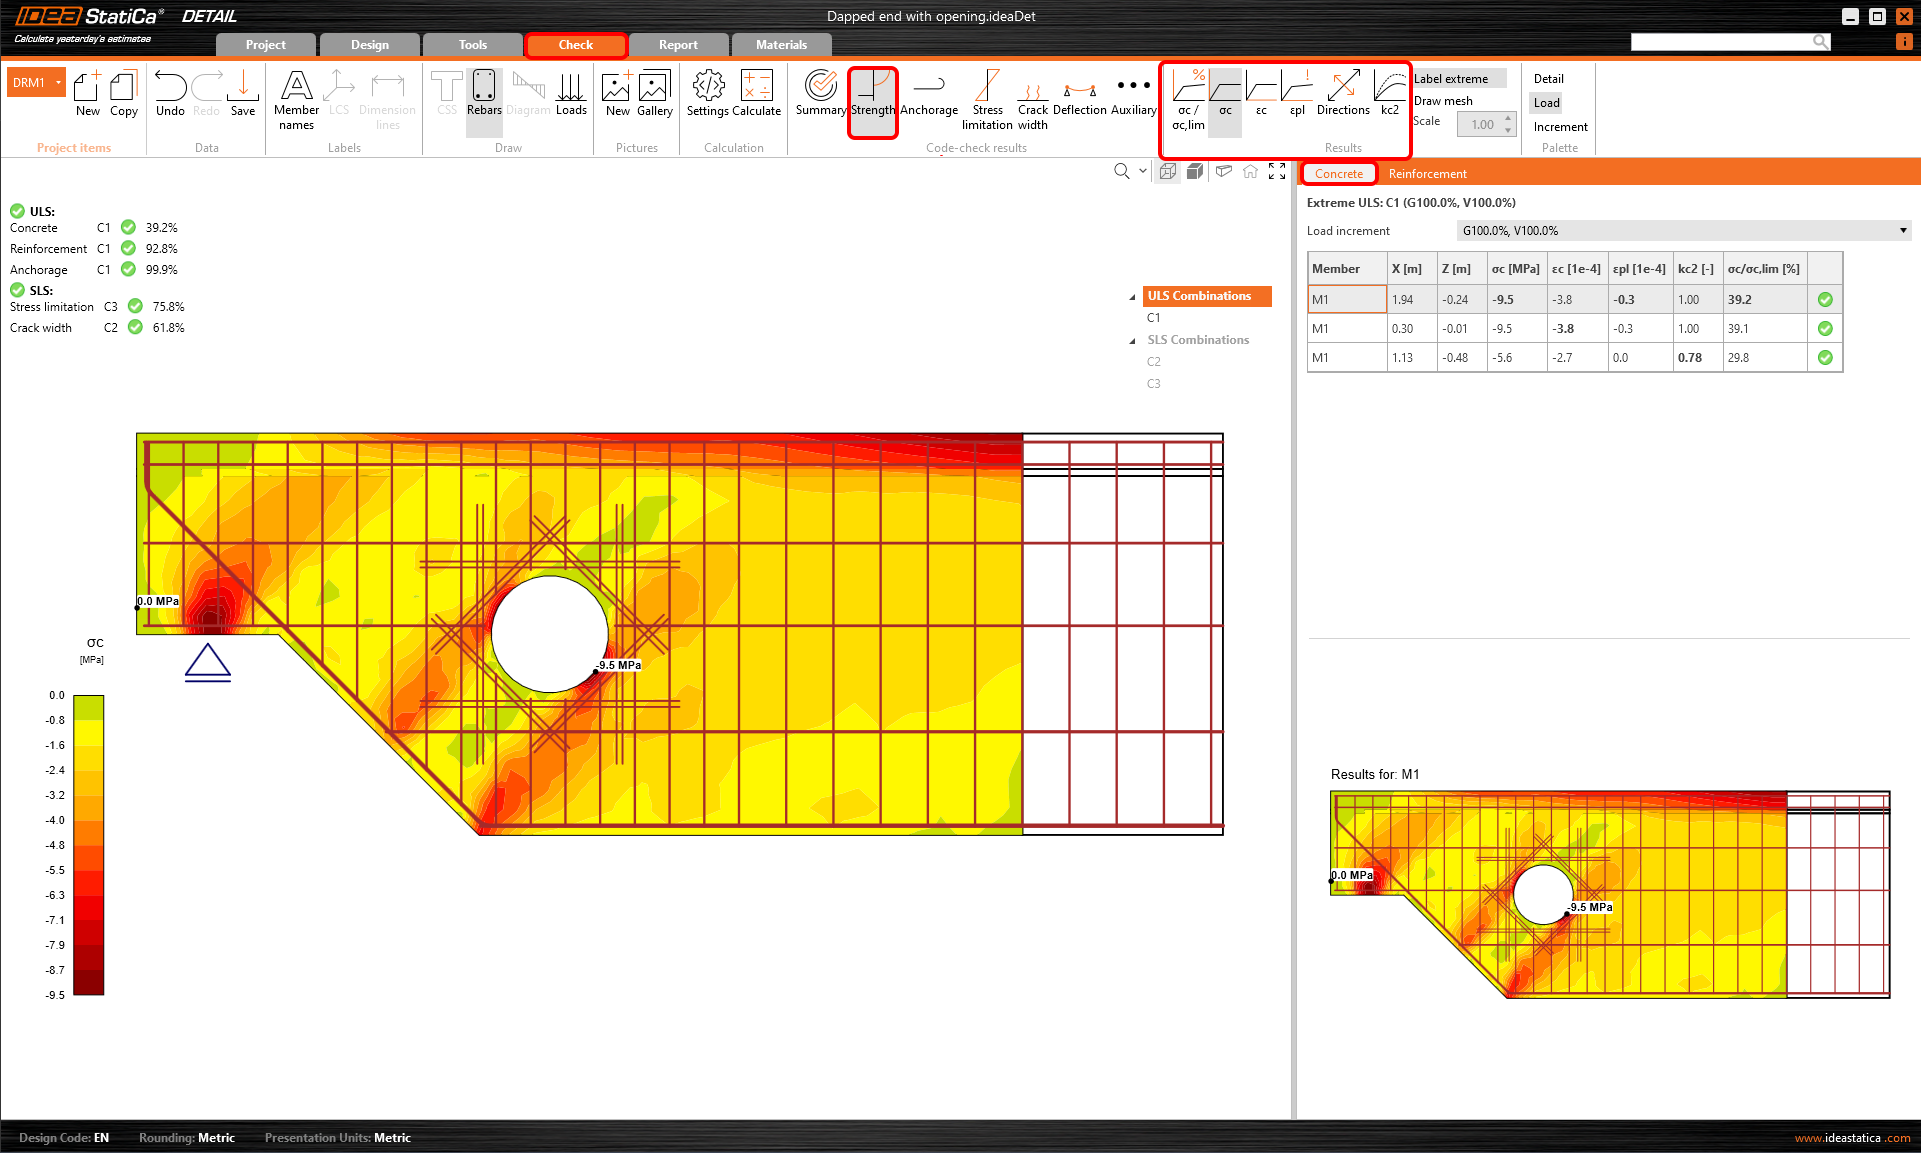
Para revisar las verificaciones detalladas de cada componente, comience con la pestaña Resistencia. Esto mostrará las verificaciones del hormigón como la utilización en tensión, tensiones principales, deformaciones y un mapa del factor de reducción kc que se puede activar en la cinta.
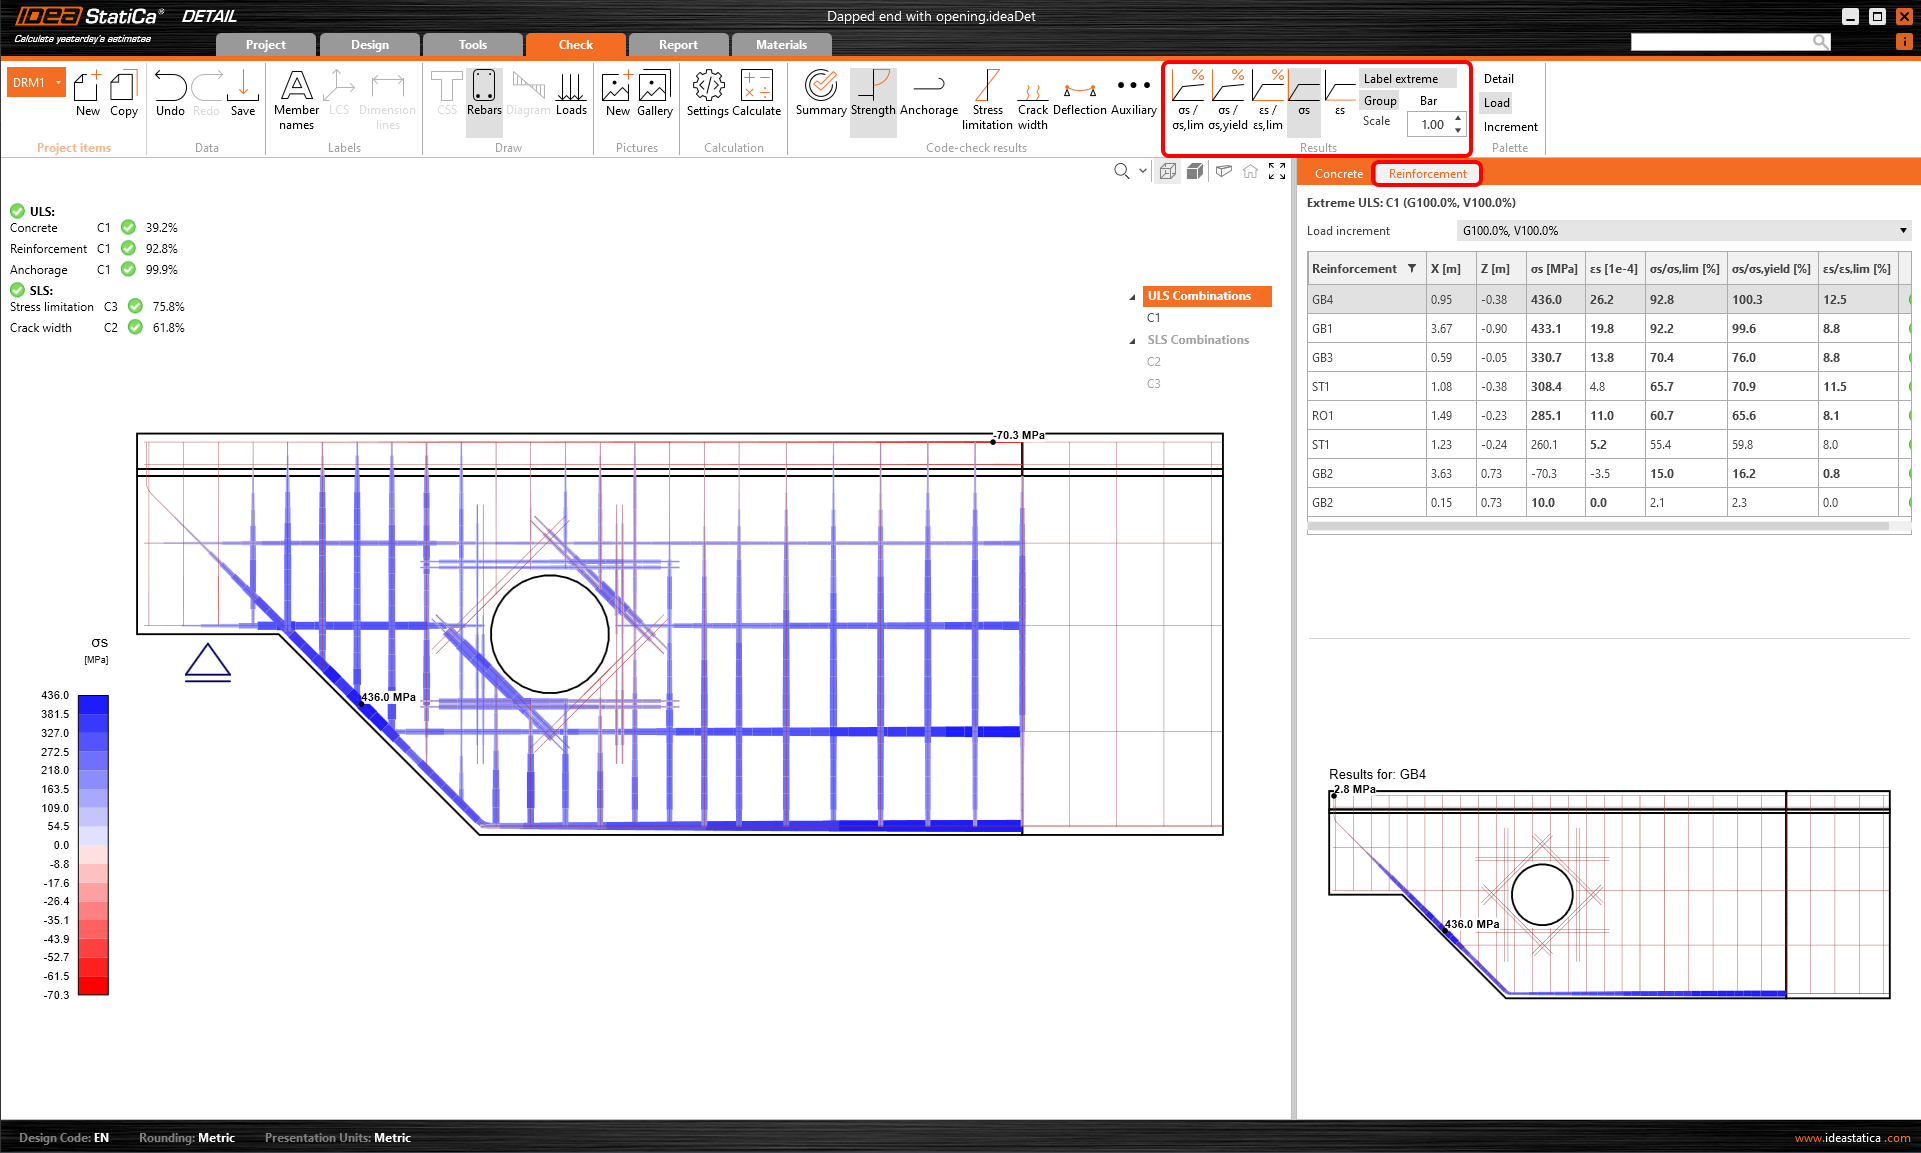
Para obtener resultados detallados de la armadura, haga clic en una fila, Armadura. Esto cambiará los iconos de la cinta y desplegará la tabla de resultados. Podemos mostrar los resultados de deformaciones y tensiones en cada barra y su utilización.
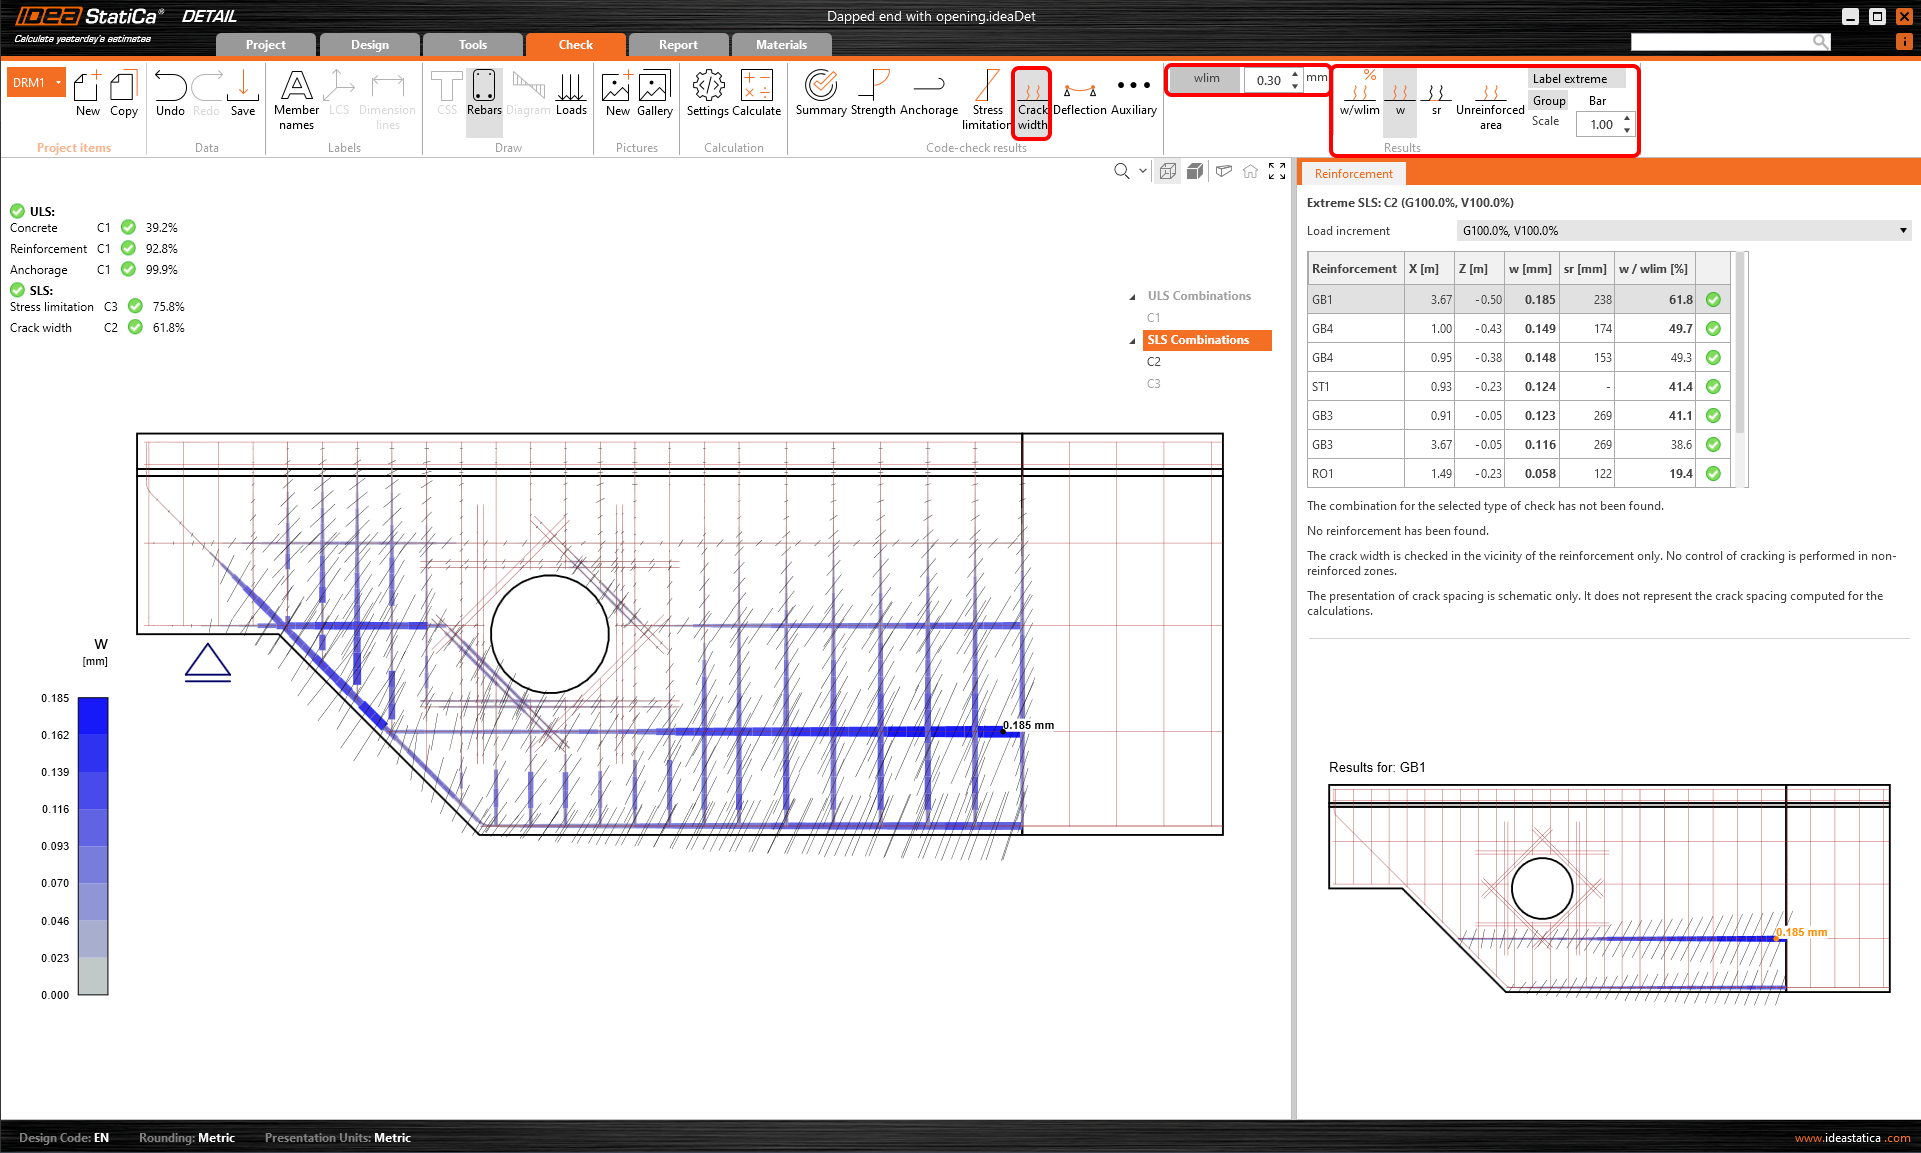
Todos los resultados pueden mostrarse de la misma manera. Mostremos la diferencia en la cinta para las verificaciones ELS de ancho de fisura y flecha. Además de los iconos para cambiar entre los resultados, hay configuraciones en la cinta para establecer el valor límite o la visualización de los resultados de los modelos a corto/largo plazo.
6 Informe
Por último, vaya al Informe. IDEA StatiCa ofrece un informe totalmente personalizable para imprimir o guardar en un formato editable.
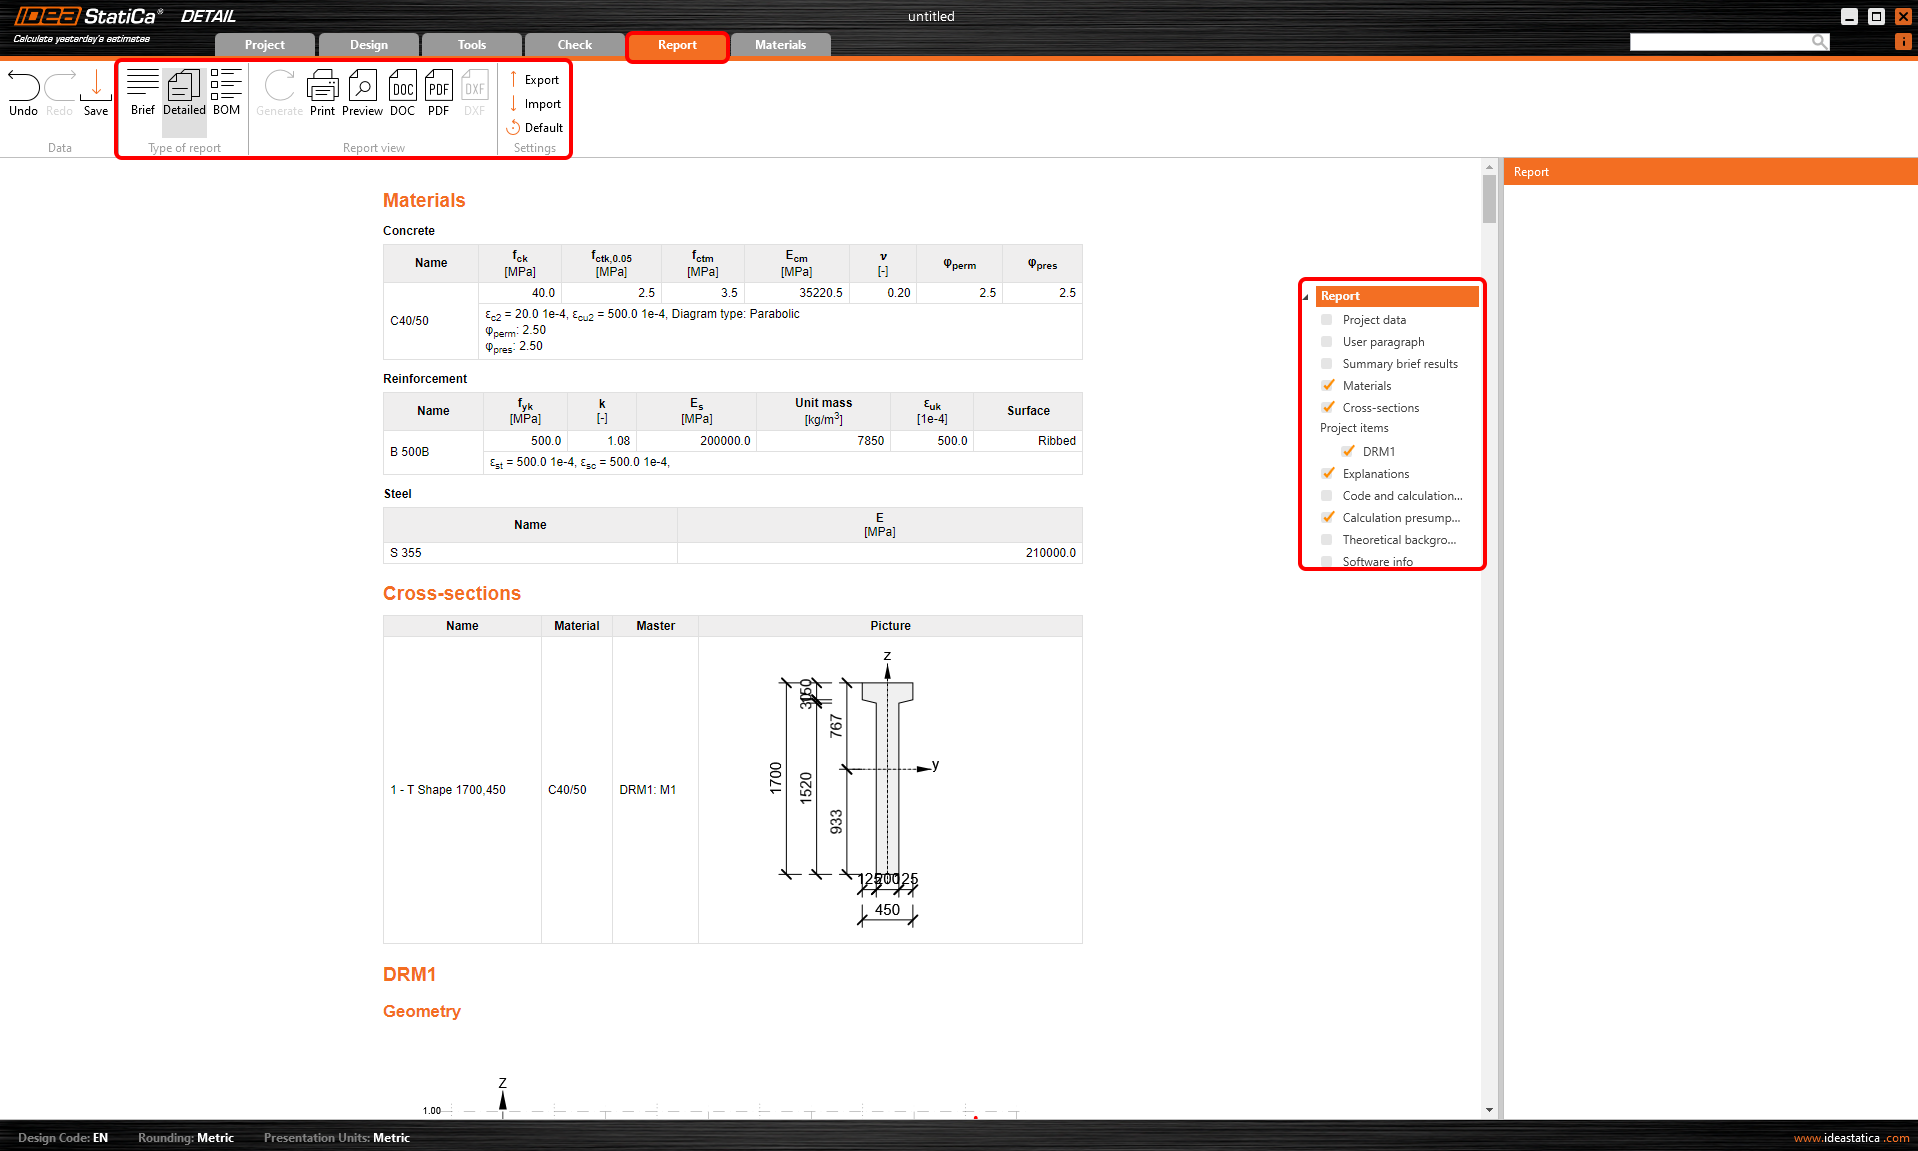
Ha diseñado, optimizado y realizado la verificación normativa de un extremo rebajado con una abertura según el Eurocódigo.