Rhino–IDEA StatiCa munkafolyamat
A Rhino/Grasshopper bővítményről
Az IDEA StatiCa együttműködik a Rhino és a Grasshopper programokkal. A Rhino és a Grasshopper egy hatékony CAD modellezési platform, amely számos bővítménnyel rendelkezik az építészeti és mérnöki ipar számára. A Grasshopper és az IDEA StatiCa Open Model kombinálása rendkívül hatékony platformot teremt az összetett kapcsolati geometria parametrikus meghatározásához. A szerkezeti elemek, keresztmetszetek és műveletek (csavarok, furatok, hegesztések és vágások) mind meghatározhatók az IDEA StatiCa Grasshopper bővítményben.
Az IDEA StatiCa lehetőséget biztosít arra is, hogy a 3D-ben modellezett geometriát hatékonyan összekapcsolja az importált VEM-modell eredményeivel, BIM-kapcsolatokat hozva létre bármely, a Grasshopperrel együttműködő CAD vagy VEM szoftverrel.
Megjegyzés: Ez a bővítmény/kapcsolat jelenleg előnézeti módban van és folyamatos fejlesztés alatt áll. Jelenleg nem tudjuk garantálni a kompatibilitást a bővítmény egyes verziói között.

Kapcsolódó alkalmazások: IDEA Open Model, IDEA StatiCa Connection, IDEA StatiCa Checkbot (önálló)
IDEA StatiCa 21.1-es és újabb verzió (2021. október-tól)
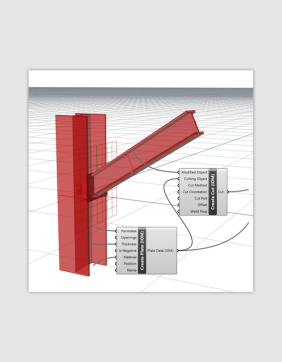
- Geometriailag összetett kapcsolatok létrehozása az összes csavarral, vágással és hegesztéssel.
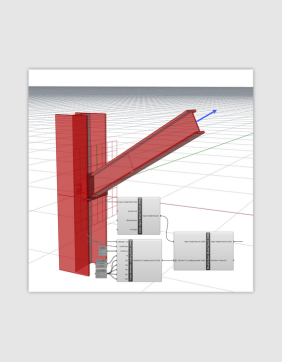
- Több kapcsolat modellezése és exportálása az IDEA Open Model segítségével.
- Geometria és eredmények összekapcsolása csatolt Open Model eredményfájlok létrehozásával.
- Kapcsolati geometria importálása és exportálása harmadik féltől származó, a Rhino és Grasshopper programokkal együttműködő alkalmazásokba és azokból.
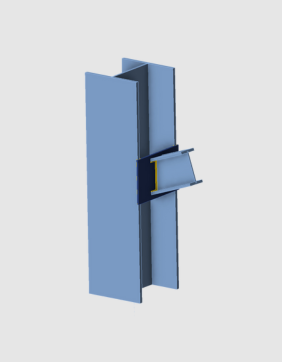
- A létrehozott IOM-fájlok importálása a Checkbot-ba a kapcsolatok és szerkezeti elemek kezeléséhez és tervezéséhez.
Tudjon meg többet arról, hogyan működik a Checkbot.
Az első lépések
A kezdéshez töltse le a bővítményt a Rhino Package Manager segítségével. Egyszerűen keressen rá az IDEAStatiCa kifejezésre.
Az IDEA Open Model komponenseket ingyenesen használhatja összetett kapcsolatok tervezéséhez. Az IDEA StatiCa Connection-be való közvetlen küldéshez és számításhoz licenc szükséges.
Ismert korlátozások
- Jelenleg a bővítmény megfelelő működéséhez a Rhino mértékegységeit méterre kell állítani.
- Minden bemeneti mértékegységet szintén alapvető SI egységekben kell megadni, az IDEA Open Model jelölésrendszerét követve.
Cikkek és oktatóanyagok
- Parametrikus tervezési lehetőségek az IDEA StatiCa Connection-höz
- A Grasshopper bővítmény komponenseinek leírása
- Grasshopper API kapcsolat – acél csomópontok tömeges számítása
- Grasshopper API kapcsolat – IDEA StatiCa IOM-fájl létrehozása importáláshoz
- Grasshopper API kapcsolat – parametrikus kapcsolati modell importálása és számítása
- Grasshopper API kapcsolat – kapcsolat hegesztésének parametrikus optimalizálása
Példák
A példák a bővítmény minden verziójával együtt érkeznek. Egy példát a bővítmény telepítési mappájában érhet el a számítógépén, amely általában itt található: "%appdata%\McNeel\Rhinoceros\packages\7.0\IDEAStatiCa\0.1.1\Examples.zip"
Súgó és visszajelzés
Ezeket az eszközöket haladó felhasználókkal és az általuk igényelt munkafolyamatokkal szoros együttműködésben fejlesztjük.
Szívesen fogadunk minden visszajelzést vagy javaslatot a funkcionalitás javítása érdekében. A visszajelzés legjobb módja az IDEA StatiCa GitHub fórumán keresztül.
Ha általánosságban szeretne többet megtudni a Grasshopperről, javasoljuk, hogy forduljon Krishez a Learn Grasshopper oldalon, és keressen oktatási anyagokat, vagy kérjen képzést.