Calculul structural al unei secțiuni I precomprimate (EN)
1 Proiect nou
Să lansăm IDEA StatiCa, să mergem la fila Beton și să selectăm aplicația RCS. Creați un proiect nou făcând clic pe Creare proiect nou. În dialogul următor, păstrați setările implicite generale Eurocode și selectați o secțiune 1D pe etape/precomprimată/compozită, așa cum se vede în captură de ecran.

Aceasta va crea un proiect gol cu posibilitatea de a introduce secțiuni precomprimate. La început veți adăuga un extreme suplimentar, astfel încât să puteți verifica secțiunea în stadiul de pretensionare și, de asemenea, la sfârșitul duratei de serviciu proiectate. Pentru aceasta, mergeți la Secțiuni și adăugați un extreme Nou. În final, redenumiți extremele și setați timpul la 7 și 18250 zile (50 de ani).

2 Proiectare
Începeți cu introducerea secțiunii transversale. În fila Secțiune transversală, începeți cu secțiunea I cu tălpi înclinate din panglică și introduceți toate dimensiunile așa cum se vede în imagine.

După aceea, veți vedea secțiunea transversală în scenă și îi veți schimba materialul acum.

Să continuăm cu introducerea armăturilor pretensionate. Comutați fila din Navigator la Pretensionare și rulați Editorul de armătură.

Mai întâi, introduceți armăturile pretensionate pre-tensionate ca Nou pe muchie. Pentru a vedea numerele muchiilor, activați-le din panglică. Schimbați tipul la Pre-tensionat și ajustați proprietățile după cum urmează:

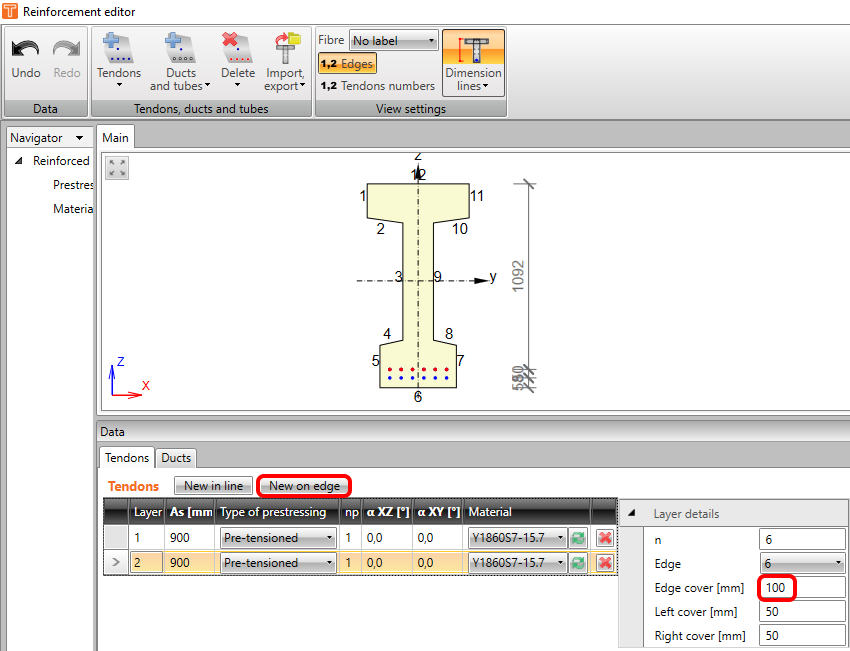
Să adăugăm al doilea rând de armături pretensionate făcând clic din nou pe Nou pe muchie. Modificați acoperirea muchiei.
Puteți combina armăturile pre-tensionate cu cele post-tensionate în etape diferite. Dar introducerea lor se face într-un singur loc și este guvernată de np (ordinea pretensionării). Să adăugăm ultima armătură pretensionată ca Nou în linie. Modificați tipul, np și proprietățile așa cum se vede în captură de ecran.

Treceți la fila Element de proiectare din navigator. Păstrați valorile implicite ale claselor de expunere. Modificările importante pentru acest tutorial se află în fila Etape de execuție. Adăugați o etapă de execuție suplimentară și modificați timpul pentru a doua și a treia etapă de execuție. De asemenea, bifați caseta de selectare din coloana pretensionare pentru a treia etapă de execuție (lângă aceasta apare numărul 2, care indică faptul că toate armăturile pretensionate cu np=2 vor fi introduse în această etapă, în cazul nostru armătura post-tensionată).

În fila Etape de acțiune, se pot introduce efectele încărcărilor permanente ca increment pentru fiecare etapă în valori caracteristice. Exemplul nostru introduce o singură încărcare permanentă la momentul pretensionării. Completați tabelul după cum urmează:

Continuați în fila Forțe interioare cu transferul efectelor permanente Toate și efectelor pretensionării. Veți completa aceste valori cu valorile de calcul ale efectelor variabile. Vă rugăm să observați că valorile introduse anterior au fost înmulțite automat cu factorii parțiali corespunzători (de ex. 1500*1,35=2025).

Vă rugăm să comutați la extremul denumit Pretensionare și să faceți clic din nou pe Toate. Nu veți introduce nicio încărcare variabilă în această etapă. După aceea, puteți reveni la Sfârșitul duratei de serviciu proiectate.

3 Armătură
Înainte de verificări, trebuie să armați secțiunea. Cea mai bună opțiune în cazul secțiunilor dreptunghiulare, T și I este utilizarea unui șablon. Ajustați proprietățile acestuia conform capturii de ecran.

Acesta ar trebui să fie rezultatul efortului dumneavoastră:

4 Verificare
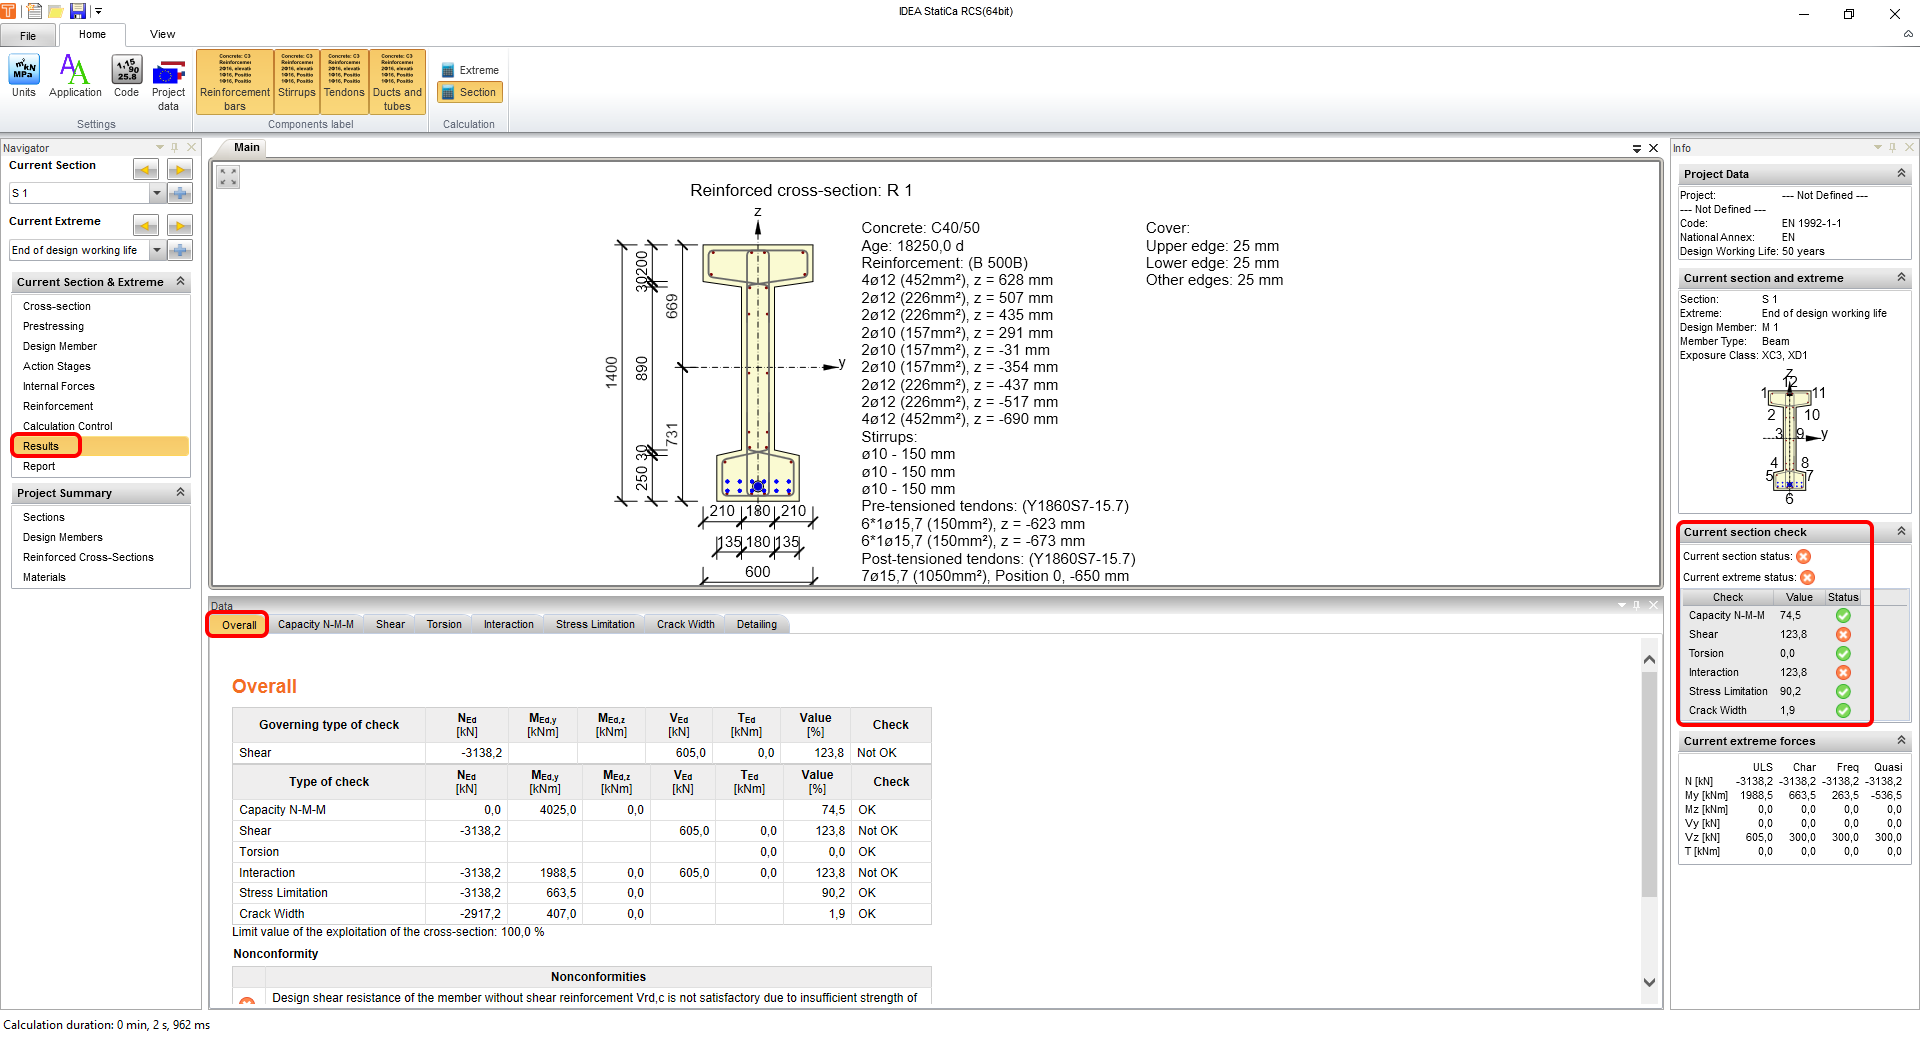
Pentru a rula verificările, faceți clic pe Rezultate în navigator. Primul lucru pe care îl vedeți după calcule este un rezumat al tuturor verificărilor. Cel mai rapid mod de a vă asigura că totul este în regulă este să priviți partea dreaptă a ecranului. În acest exemplu vedeți că verificările la forfecare și, ulterior, cele de interacțiune nu sunt satisfăcute. Acesta este rezultatul valorii implicite conservative a unghiului bielei comprimate.
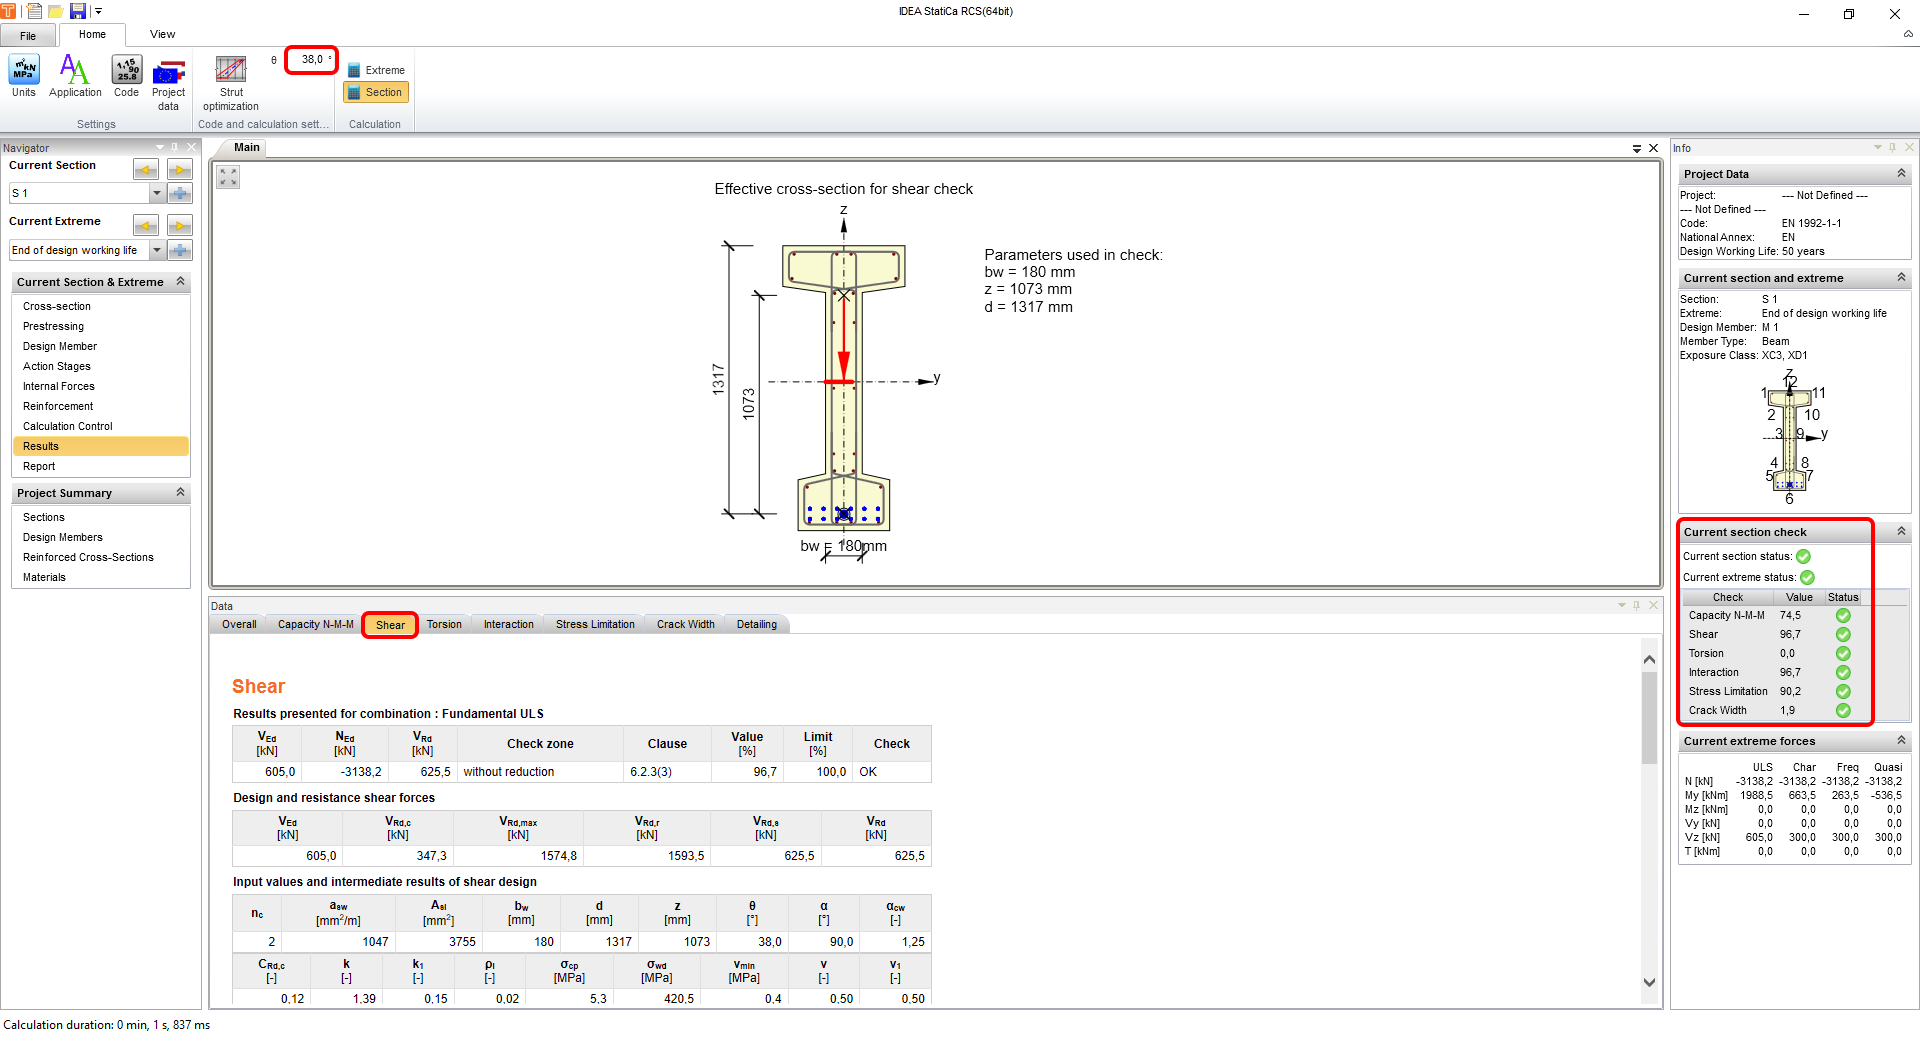
Pentru a schimba aceasta, mergeți la fila Forfecare și modificați manual unghiul la 38° sau utilizați optimizarea bielei. După modificare, ambele extreme vor fi recalculate și toate verificările vor fi satisfăcute.
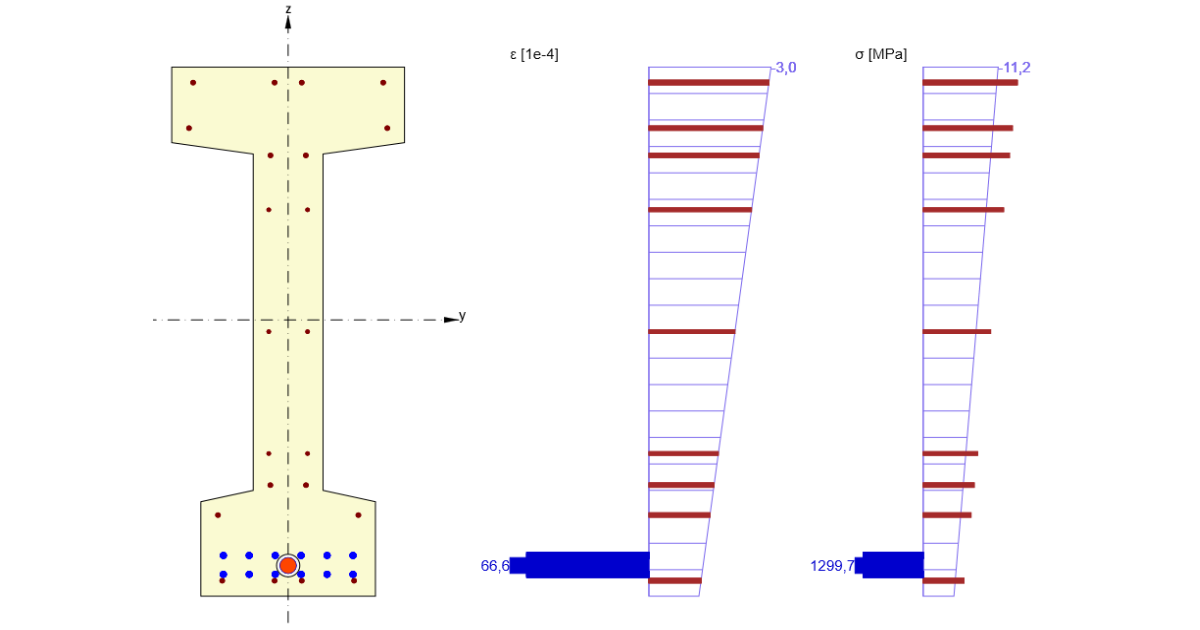
Pentru a vedea diferența dintre etape, veți utiliza verificările Limitarea tensiunilor, deoarece acestea oferă informații ușor de înțeles despre comportamentul secțiunii. Acestea sunt rezultatele la sfârșitul duratei de serviciu proiectate:

Pe de altă parte, vă puteți aștepta ca fibrele opuse să fie extreme fără încărcare variabilă. Comutați Extremul curent la Pretensionare și toate rezultatele vor fi afișate.

Rezultatul interesant în această etapă ar fi și starea de decompresiune, care face parte din rezultatele privind deschiderea fisurilor. Așa cum se poate vedea în rezultate, IDEA StatiCa RCS verifică automat toate combinațiile corespunzătoare cu respectarea factorilor r,inf și r,sup conform claselor de expunere date și anexelor naționale.

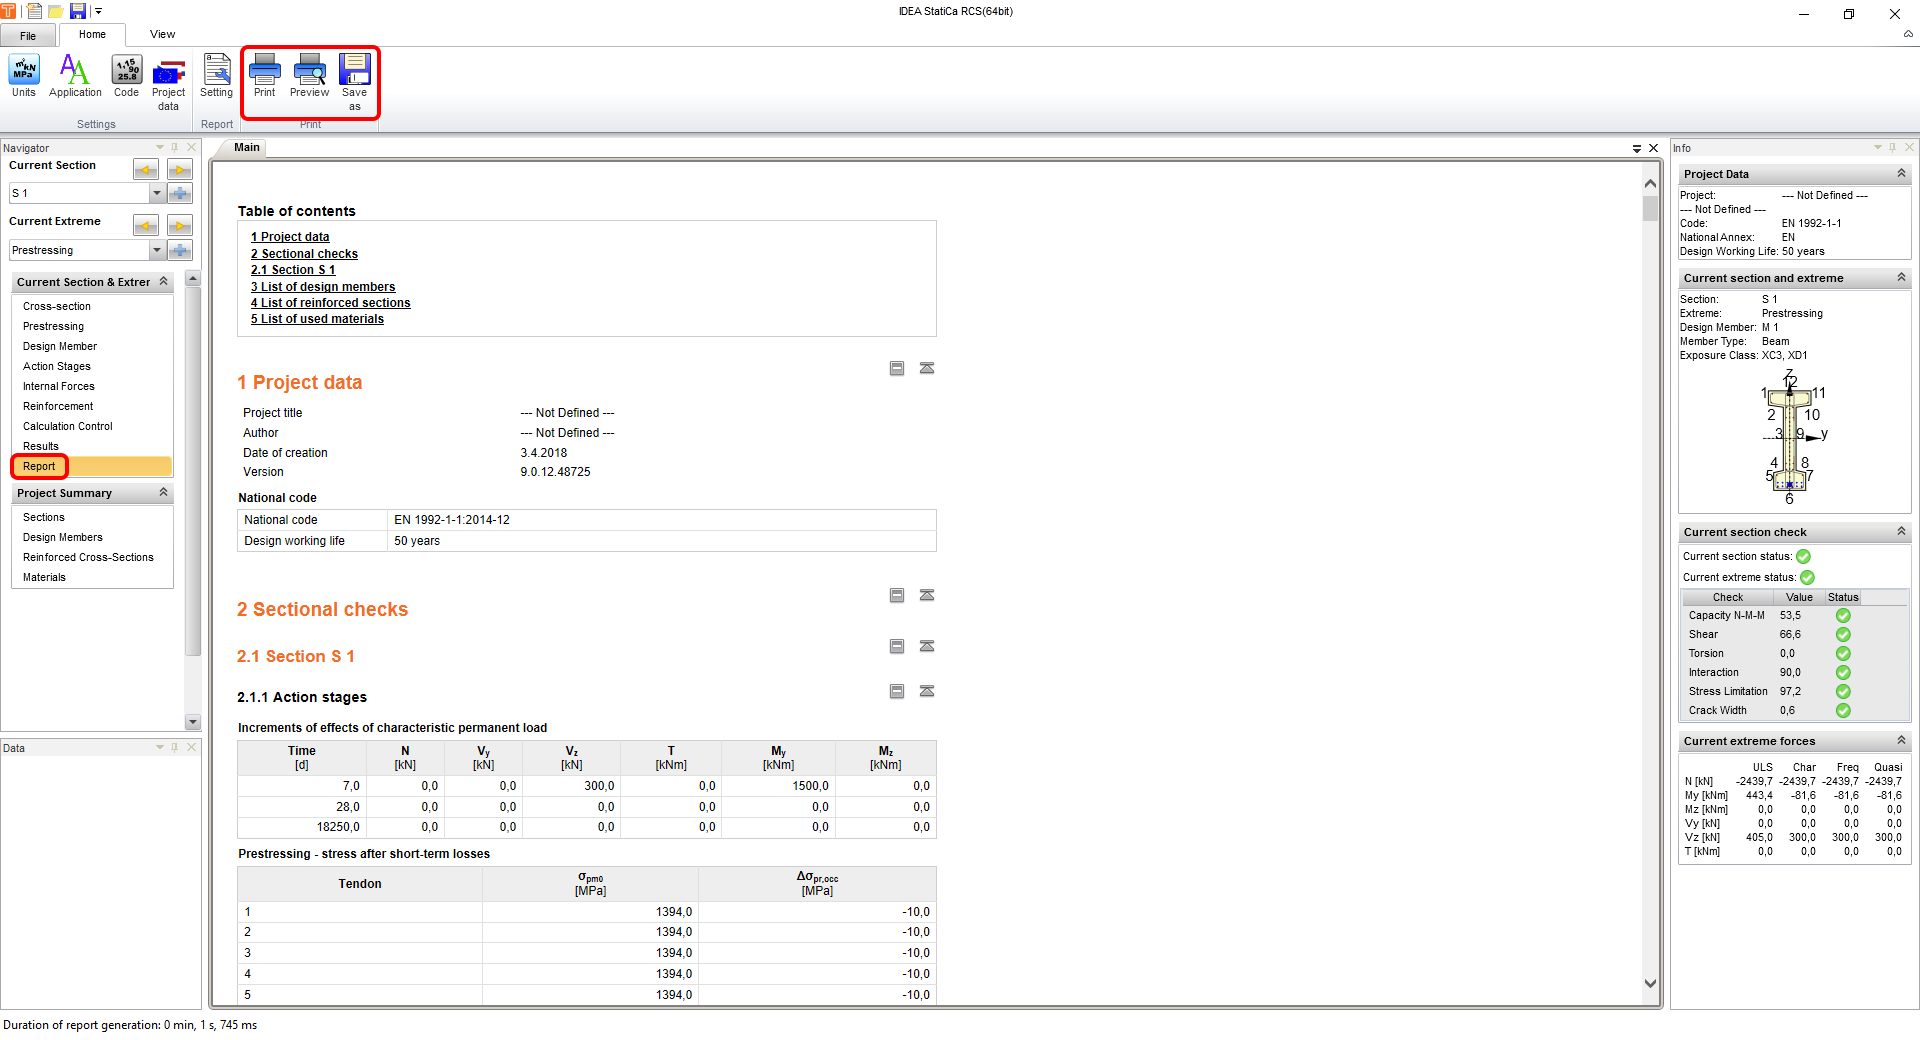
5 Raport
În final, mergeți la Previzualizare/Tipărire raport. IDEA StatiCa oferă un raport complet personalizabil pentru tipărire sau salvare într-un format editabil.
Ați proiectat, armat și efectuat verificarea conform codului a unei secțiuni I precomprimate conform Eurocode.